All Posts
Ever wanted to flip or mirror an image in Google Docs?
You’ve come to the right place – here’s how:
1 – Open up the Google Doc where the image is located (or create a new Google Doc)
Head over to https://docs.google.com and navigate to the Google Doc you wish to insert this image (and flip/mirror it in) or create a new Google Doc.
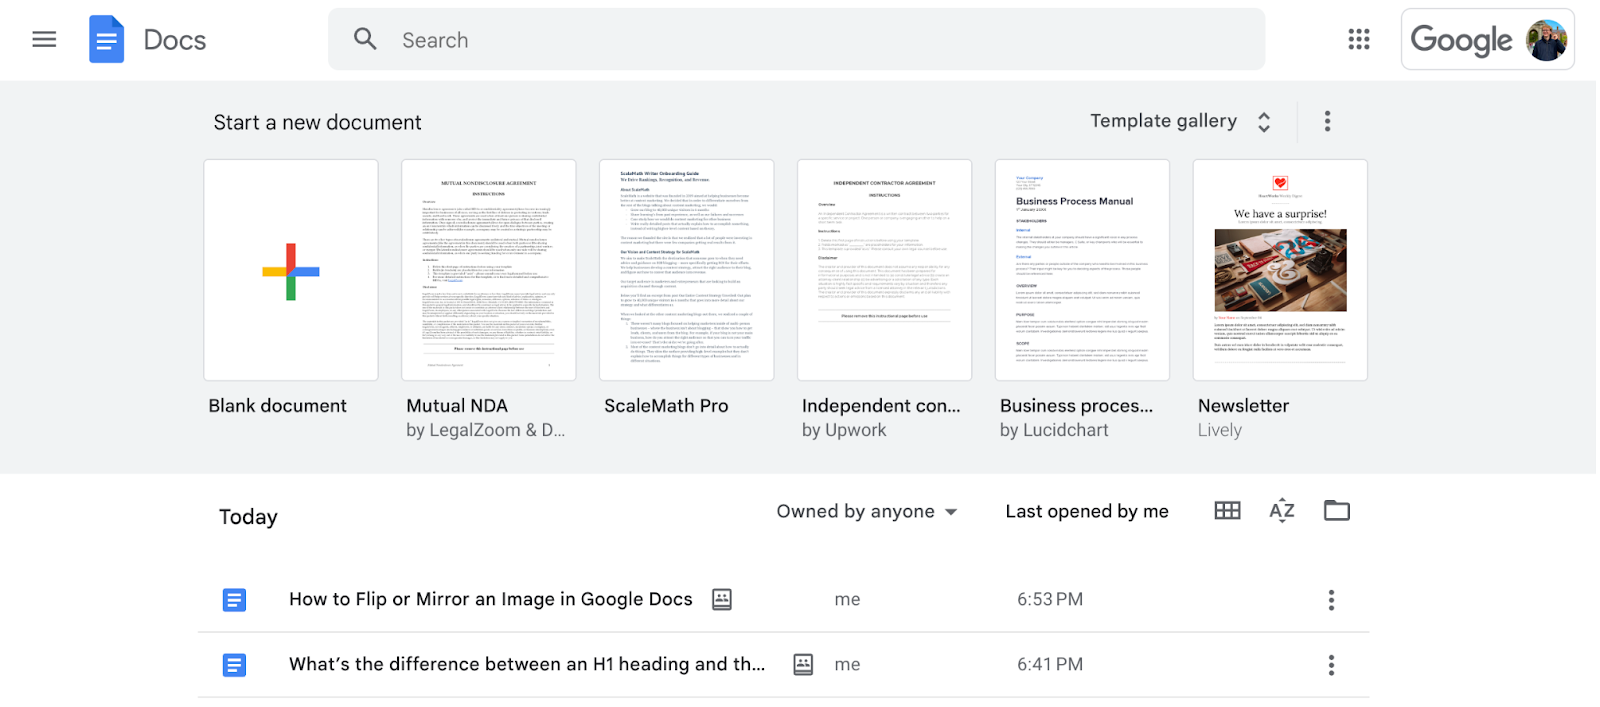
Sidenote: You can easily create a new Google Doc using the convenient docs.new shortcut in your browser:
2 – Go to “Insert” in the toolbar and then select “Drawing”
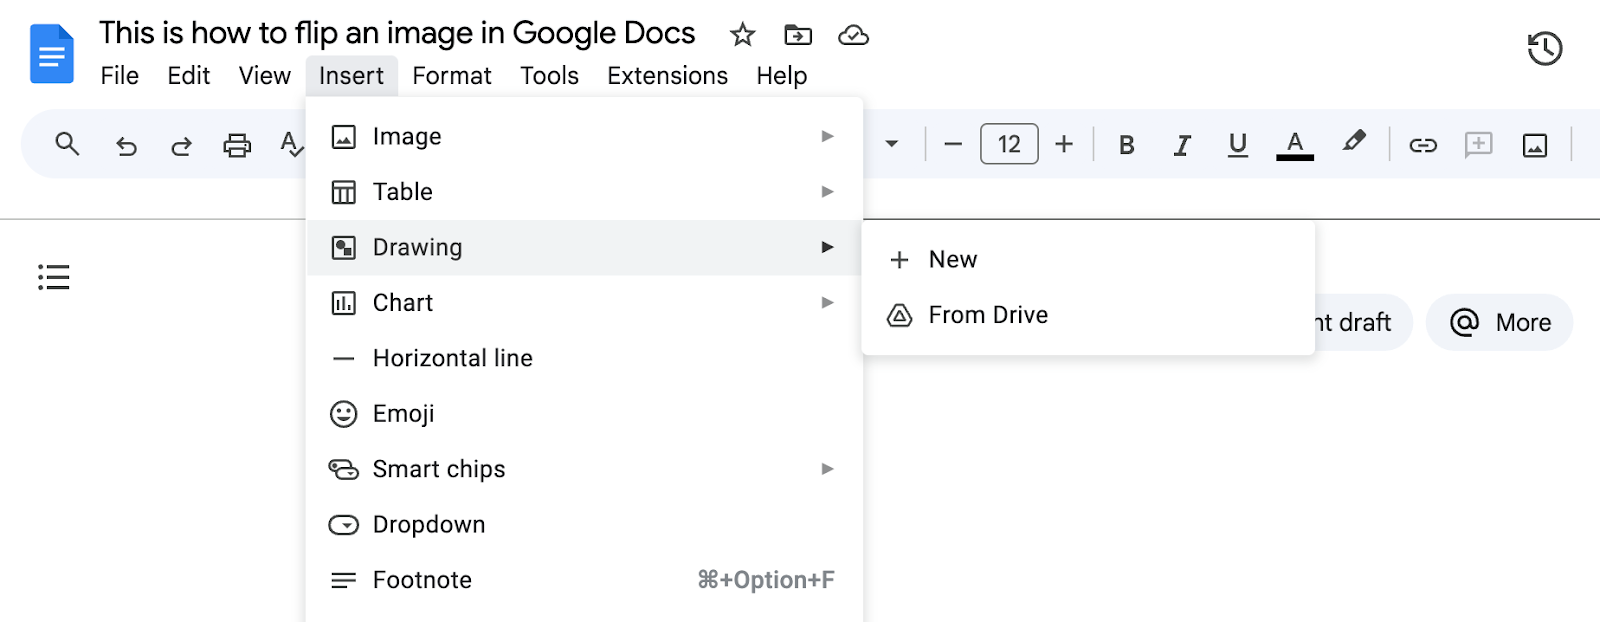
Now that you’re in the Google Doc you want to insert and flip an image in, simply use the Insert > Drawing > New option as shown below:
3 – Choose the image you want to insert
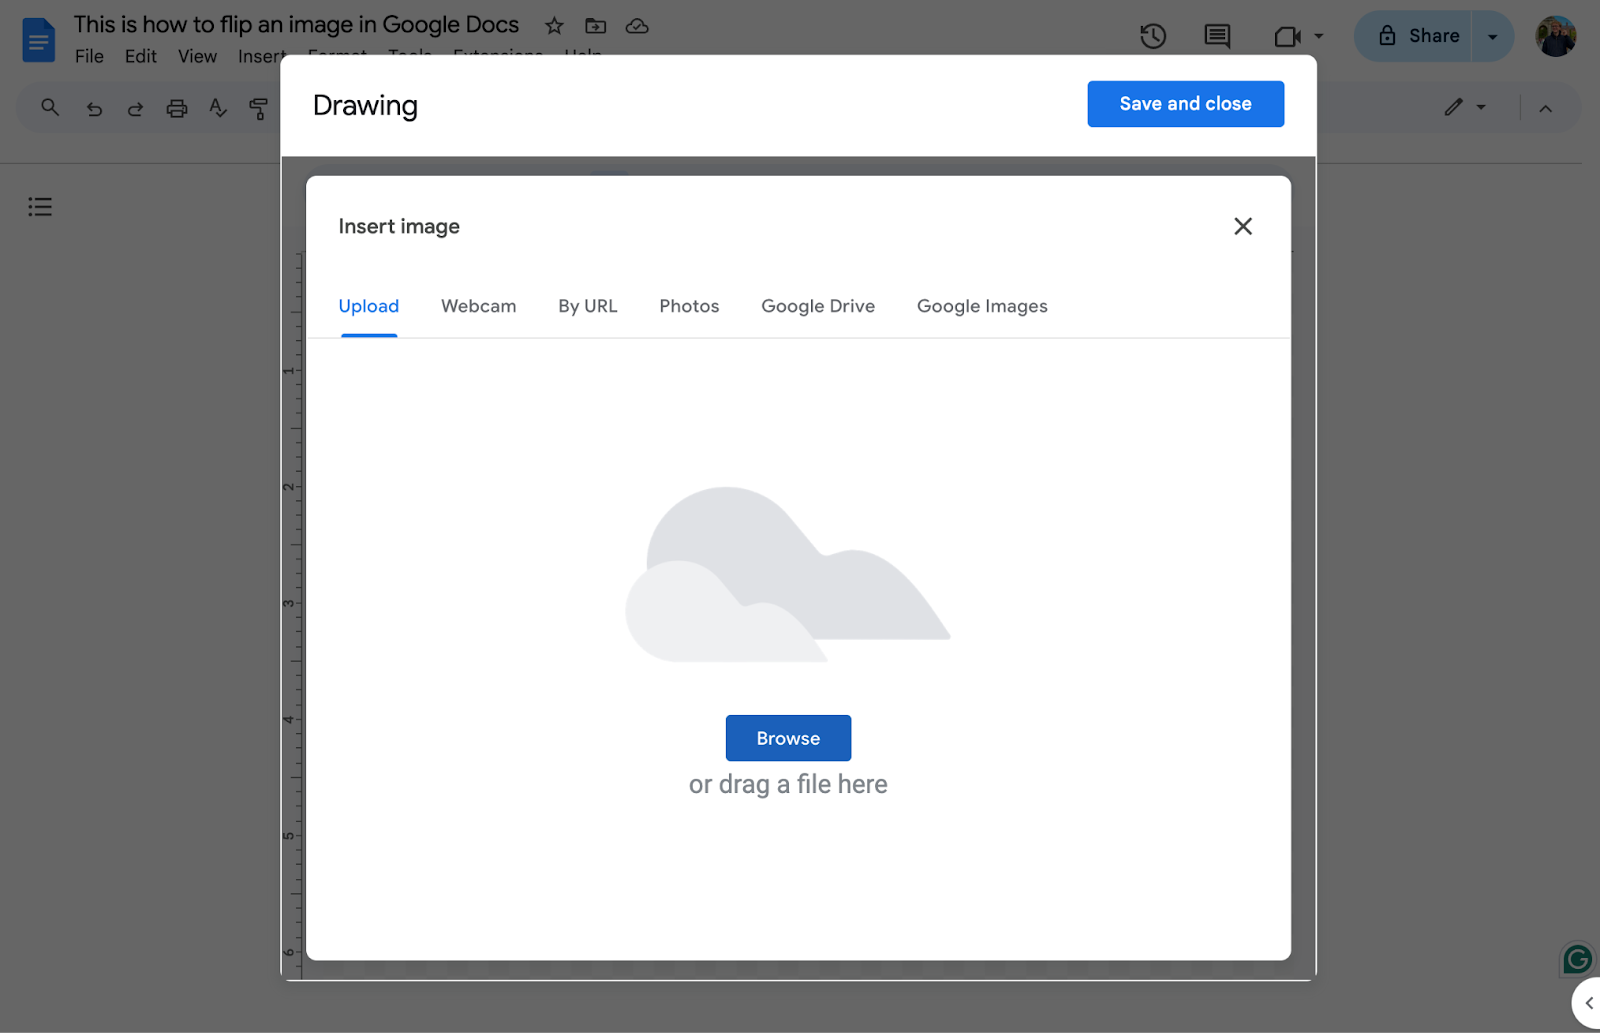
Inserting the image as a drawing is what will allow you to take advantage of the image editing (and, most importantly rotate feature). So, once the drawing modal appears as shown below – click the image frame as highlighted below:

Then proceed to select the image you wish to insert from your computer’s local filesystem, your Google Drive account, or any of the other available options.
4 – Flip the image (using “rotate”)
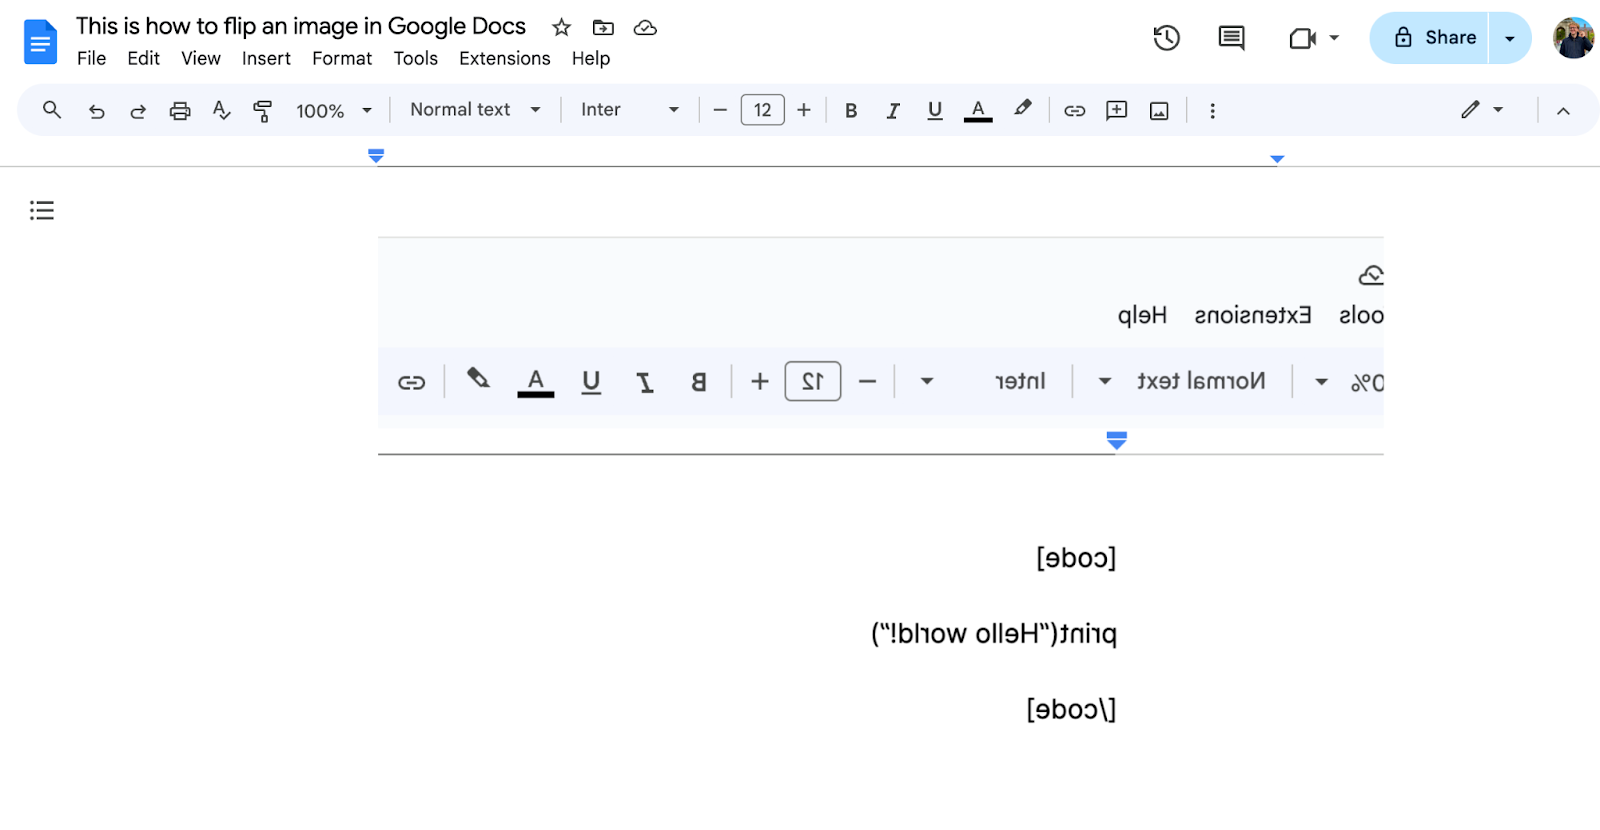
Once you’ve inserted an image, you should see it appear on the drawing canvas, as shown below:
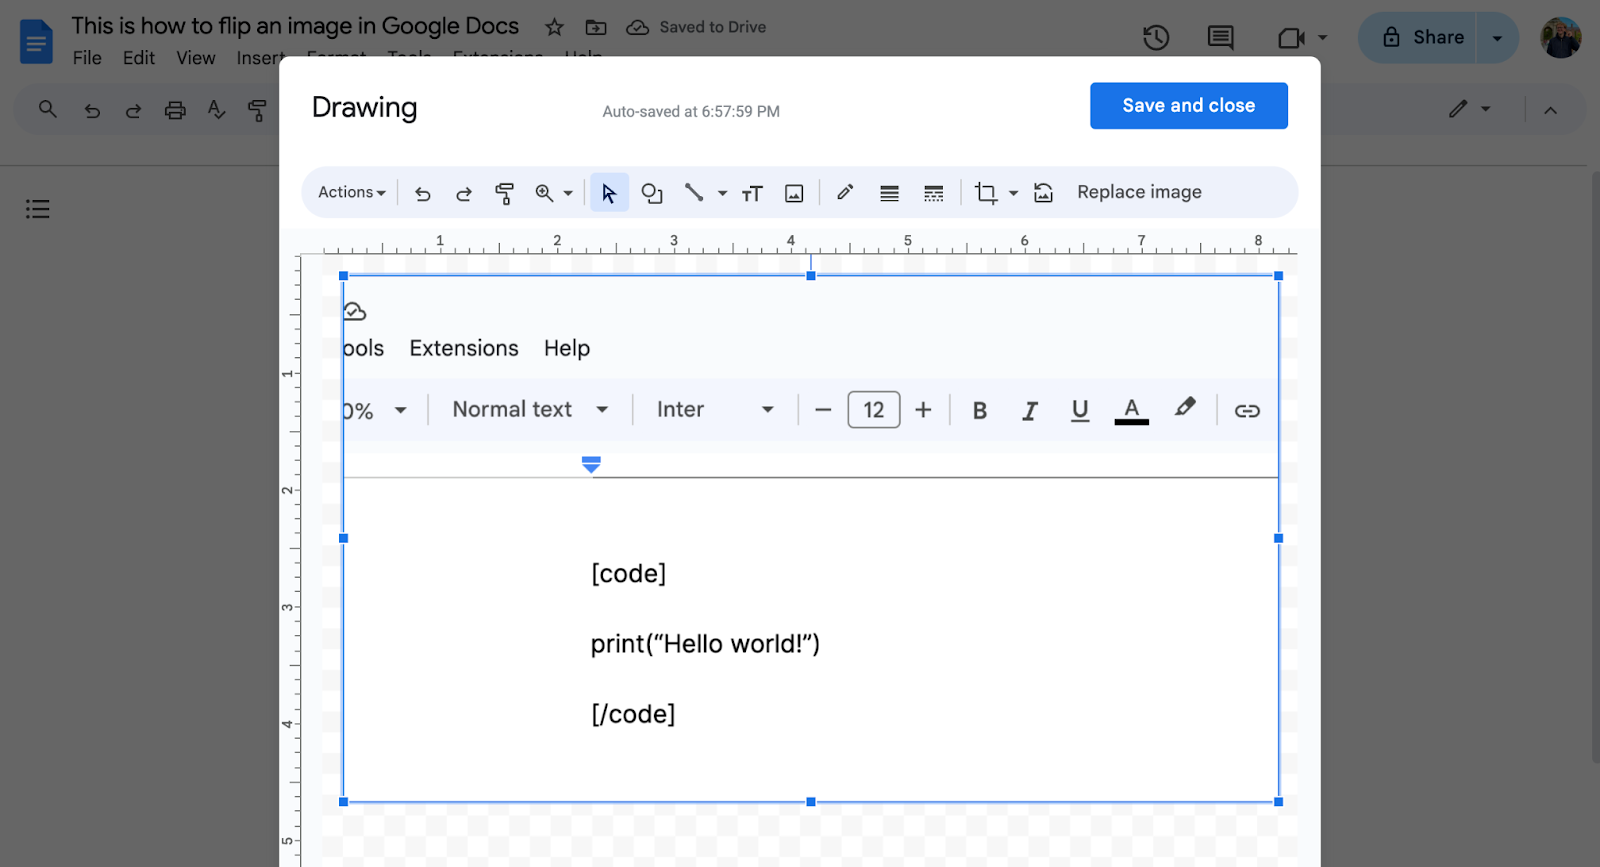
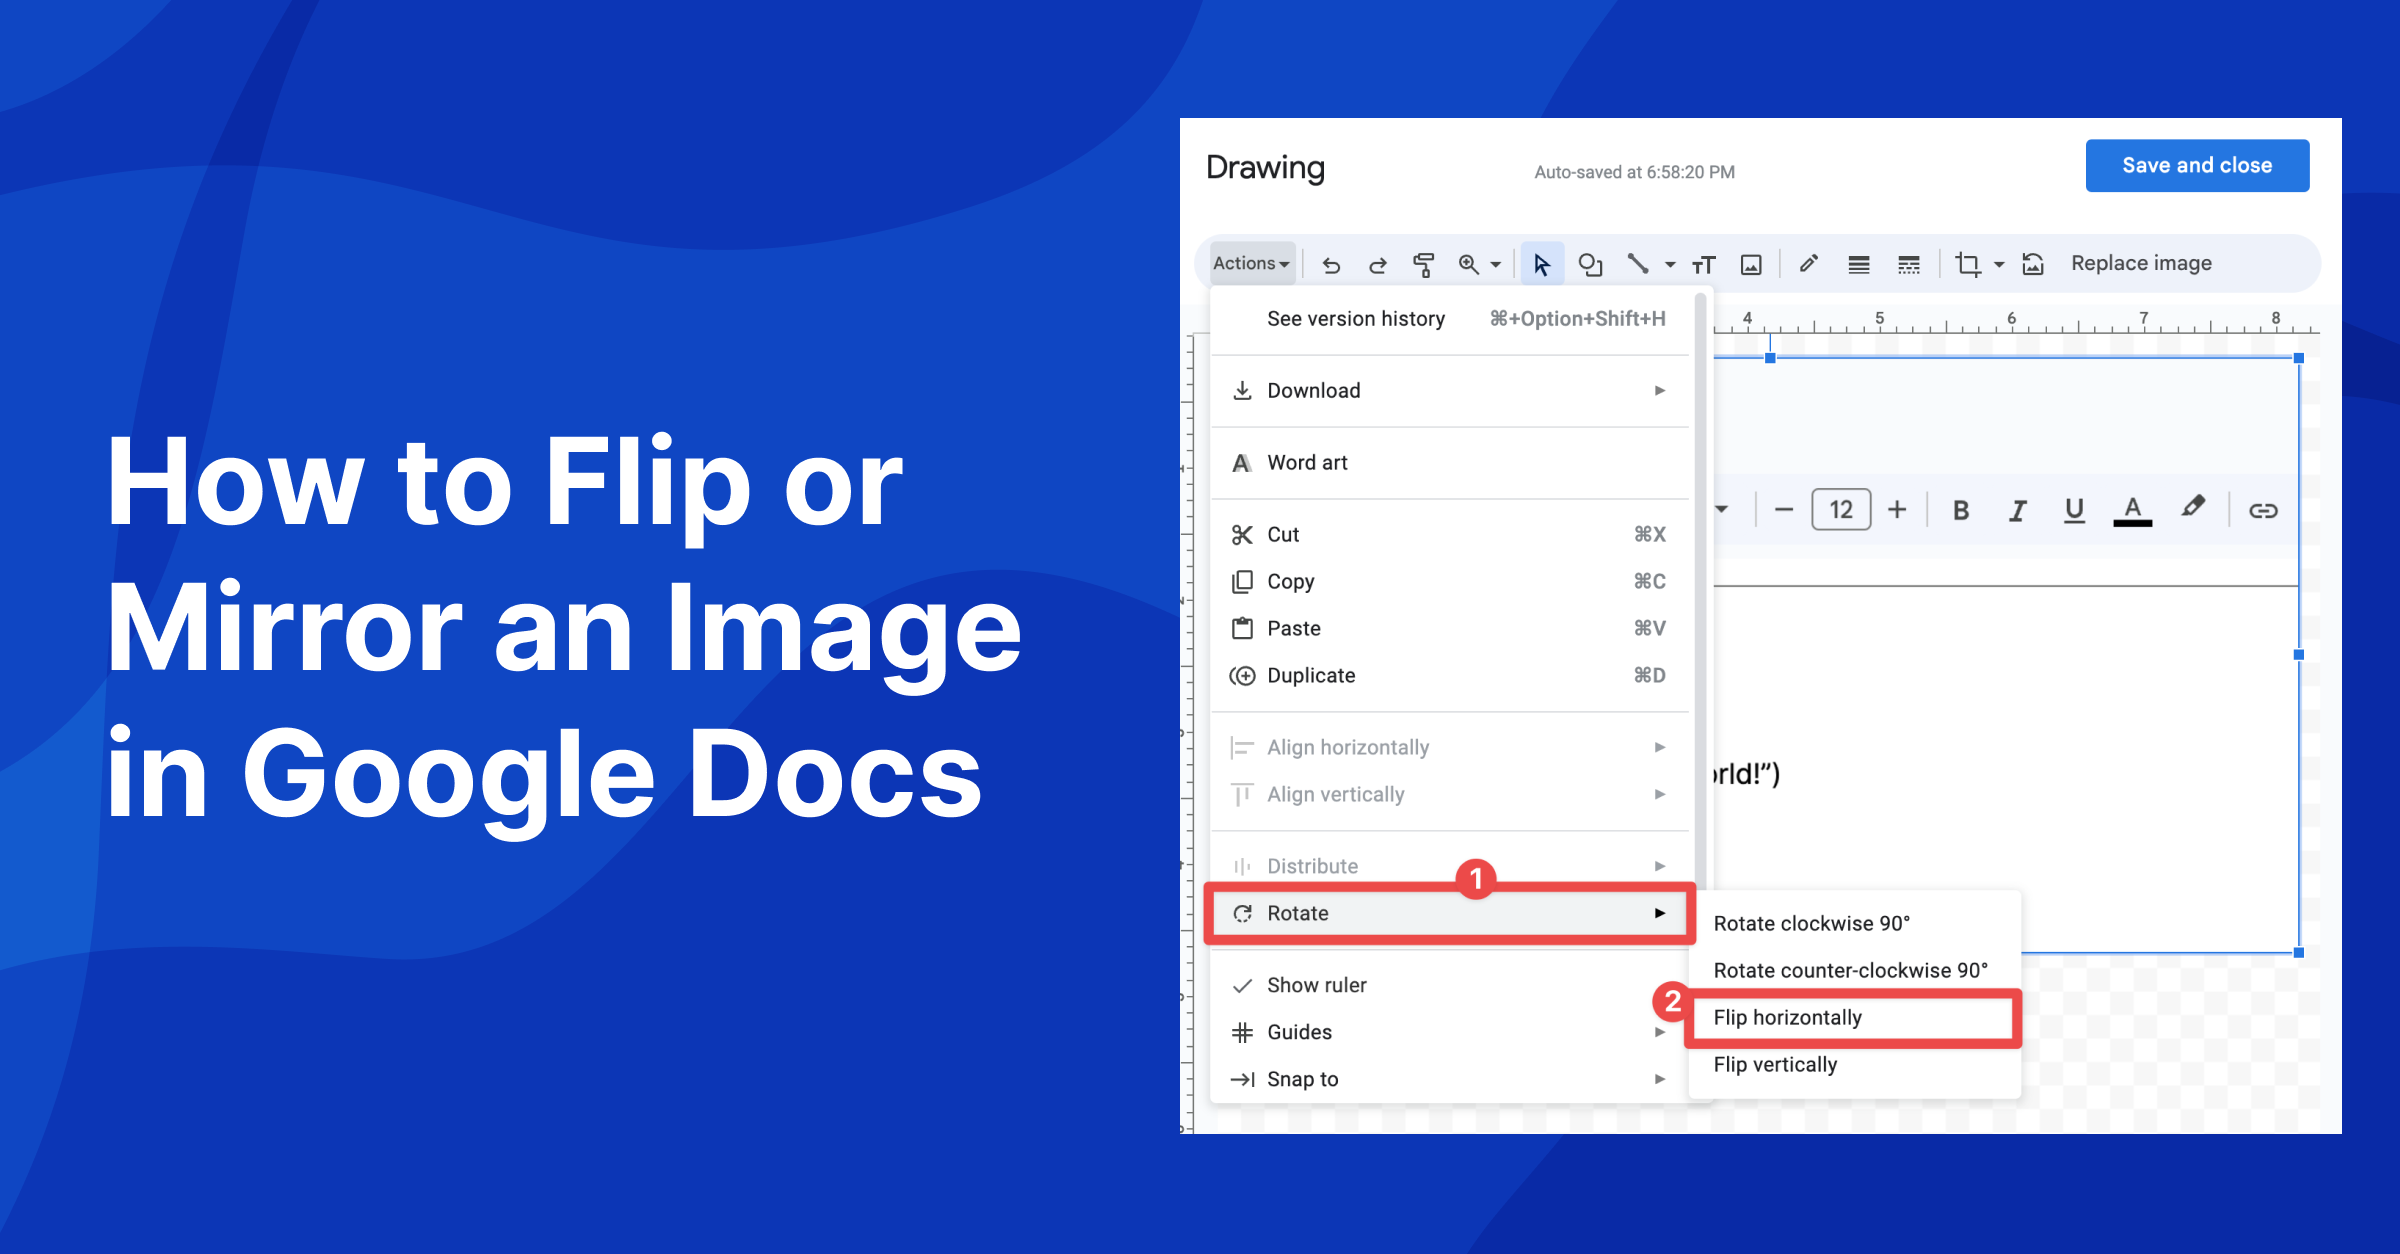
From here, all you need to do to flip the image is head to Actions > Rotate and select the rotation you wish to apply to the image.
Google Docs supports:
- Rotating an image clockwise by 90 degrees
- Rotating an image counter-clockwise by 90 degrees
- Flipping an image horizontally (the most common and popular choice)
- Flipping an image vertically
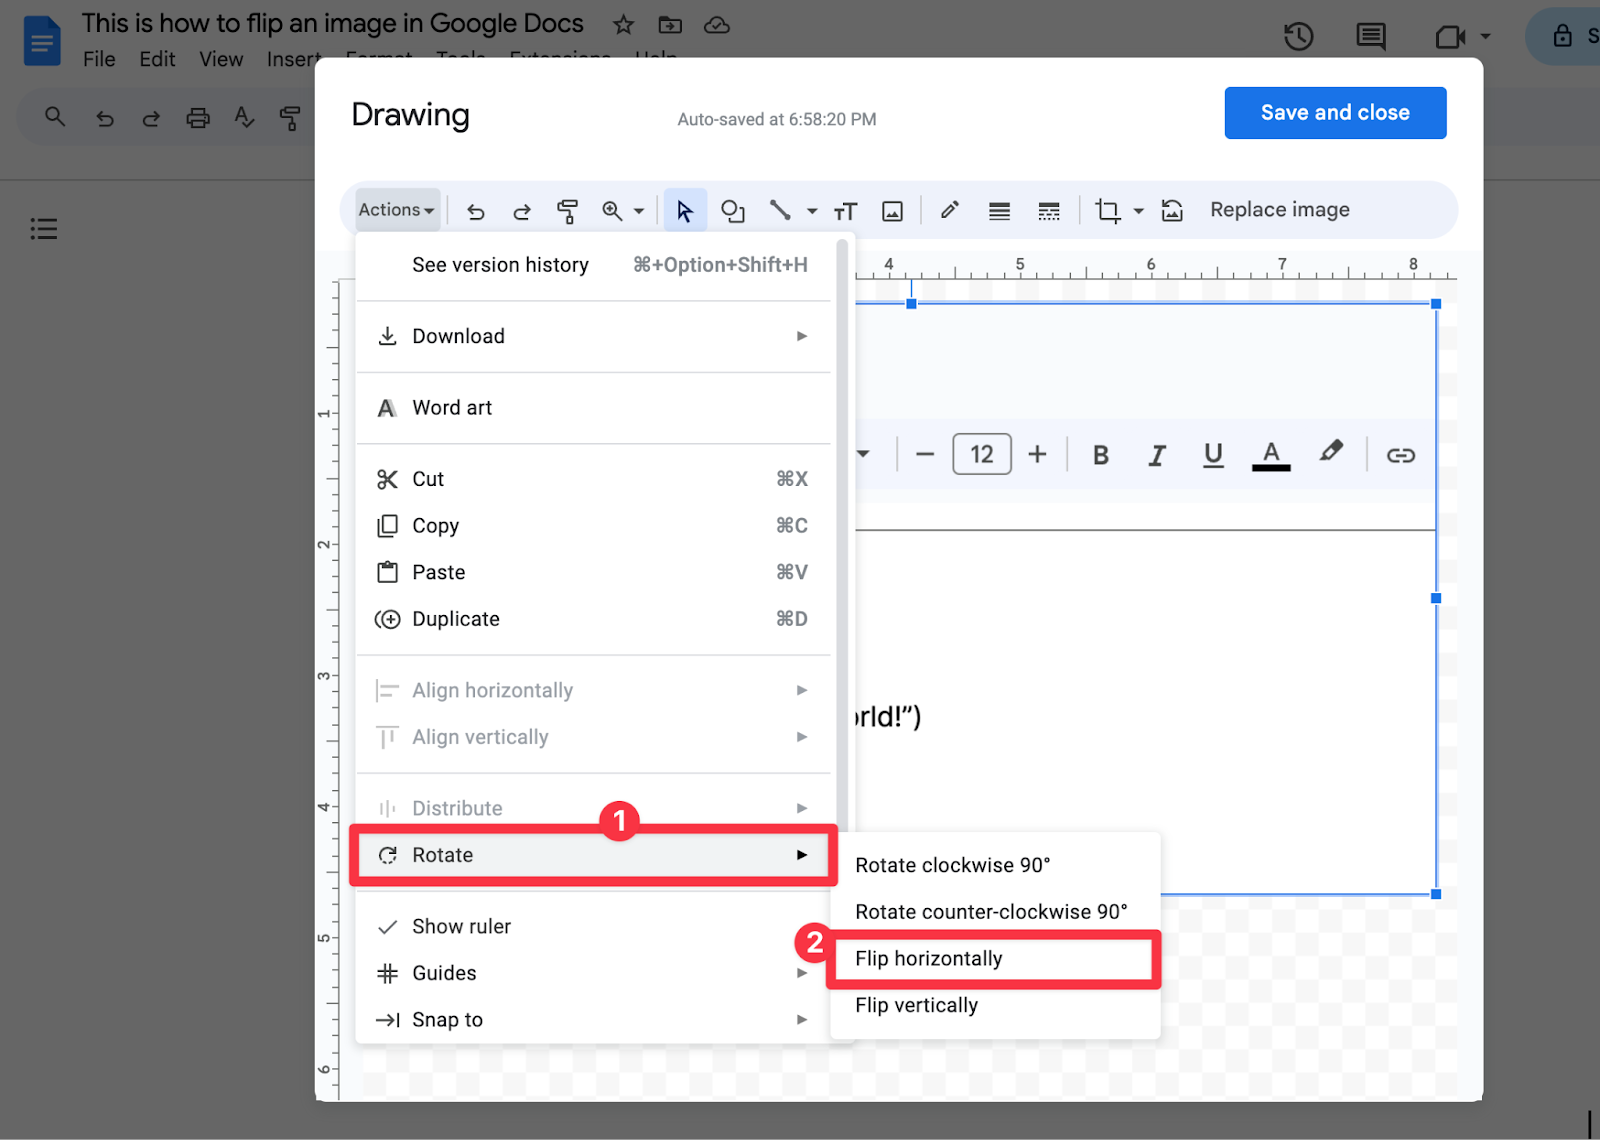
Choose whichever rotation you wish to apply to your specific image.
5 – Save & close the drawing
And once you’re happy with how the image looks, confirm the changes and insert it into your Google Doc by clicking Save and close.
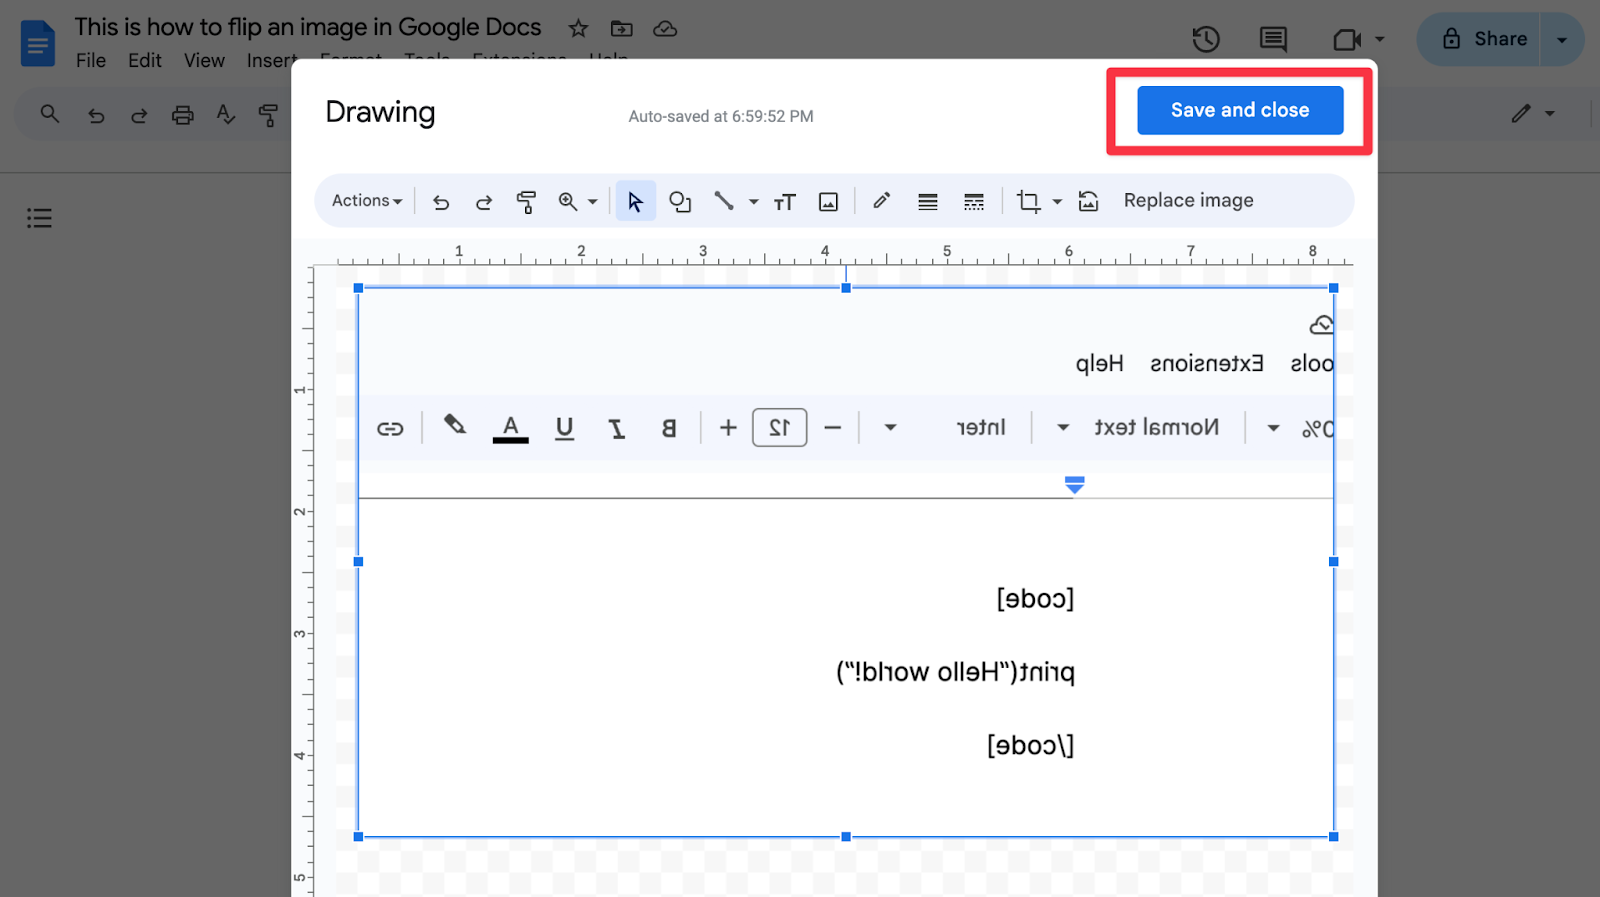
And there you have it, that image will now appear in your Google Doc:
And that’s it! You’re all set. 👏🖼️
If you’re wondering how to add alt tags to images in WordPress, you may also have wondered just how important alt tags are these days.
Is it really worth doing?
Here are five facts for you.
- There are currently 5.35 billion internet users worldwide.1
- 11 million of those have a disability which means they rely on accessibility features such as alt tags.2
- 96% of the world’s top one million web pages are not accessible.3
- On average, people spend $5,381 per year online.4
- That means that 96% of the world’s top websites are missing out on almost $60 billion worth of sales every year.
Never mind that Google treats alt tags as a key way of evaluating a web page for search5, or that last year, there were 10 lawsuits per day related to online accessibility issues.6
If you think alt tags are just a ‘little extra’, that ‘might be worth it, might not’ – it’s time to get real.
Alt tags are essential for search results, for complying with the law, for enabling millions of people to access your website, and for enjoying a large slice of a pie worth $60 billion.
Understanding Alt Tags
What are Alt Tags?
Alt tags, also known as “alt attributes” or “alt descriptions,” are HTML attributes applied to image tags to provide a text alternative for search engines and visually impaired users using screen readers. These tags are also useful in describing images when the image can not be loaded due to a network error.
The following code snippet shows an example of an HTML element with the alt attribute:
<img src="image.jpg" alt="image description">The Importance of Alt Tags for SEO
Alt tags are crucial for SEO for several reasons:
- Image Search Ranking: Search engines cannot ‘see’ images, but can read the alt text. Providing this text along with your images helps them understand and index an image properly, which is vital for both search and image search ranking.
- Contextual Relevance: Alt tags provide context and help search engines understand the relevance of an image to the surrounding text, enhancing the SEO value of that content.
- Keyword Optimization: They offer an opportunity to include relevant keywords to help improve your website’s SEO.
Importance of Alt Tags for Website Accessibility
While alt tags improve the SEO of a website, they were introduced with the specific aim of improving the accessibility of a website in several ways:
- Screen Reader Compatibility: Visually impaired users rely on screen readers that read aloud web content – alt tags provide these users with a description of the image content.
- Compliance with Web Standards: Using alt tags is part of meeting the Web Content Accessibility Guidelines (WCAG), a set of web standards that ensure accessibility for all users.
An additional benefit is that if an image fails to load, the alt text will display in place, informing the user of the intended content. This is helpful when linking to a broken image as having a description of the image makes it easier to find it and fix the link.
How to Add Alt Tags to Images
There are three main ways to add alt tags to images:
Method 1: Adding Alt Tags to Existing Images
Here’s how to add Alt tags to existing images in WordPress blog posts:
- Edit Blog Post: Log in to your WordPress dashboard and open the blog post for editing.
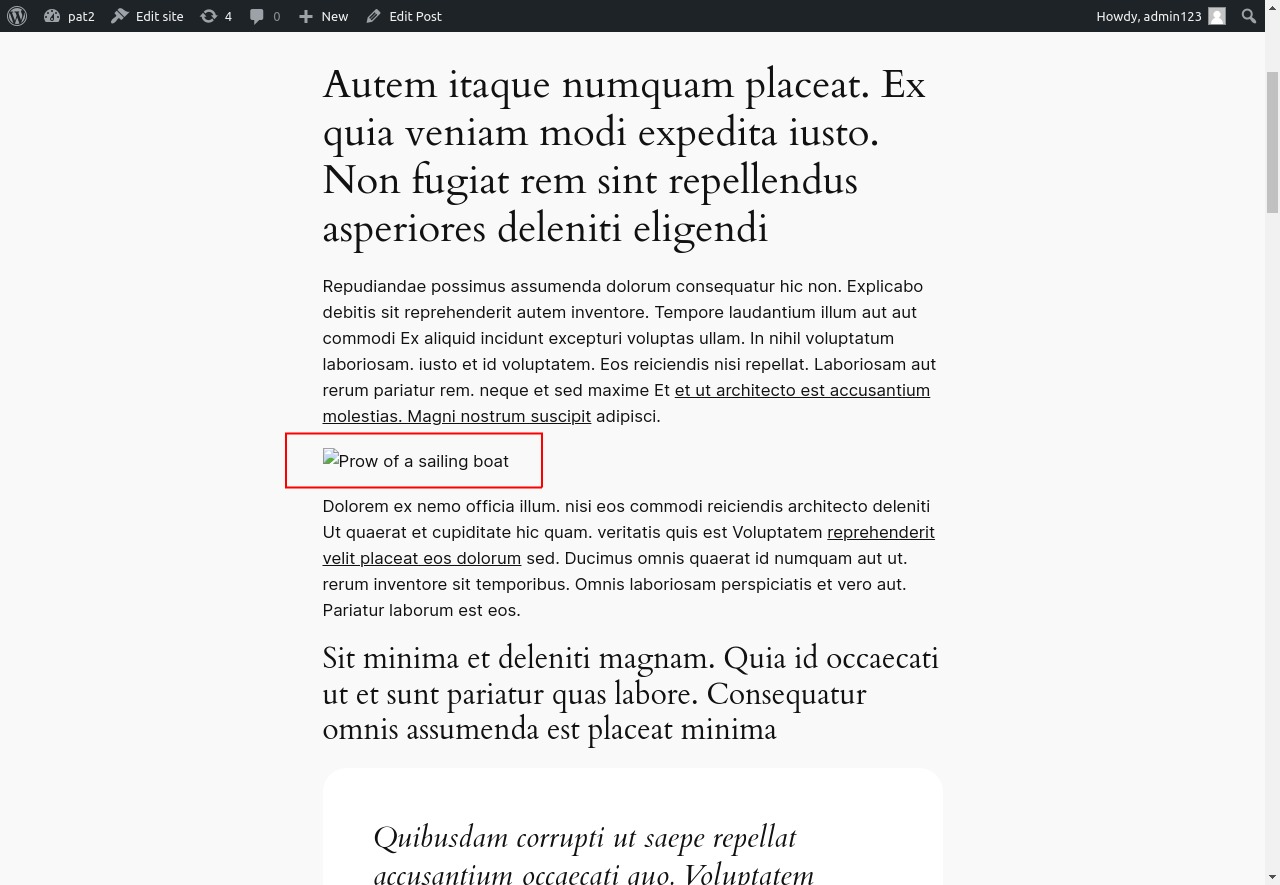
- Select an Image: Click on the image for which you want to add an alt tag – this will open the image attachment details on the right hand side (see below).
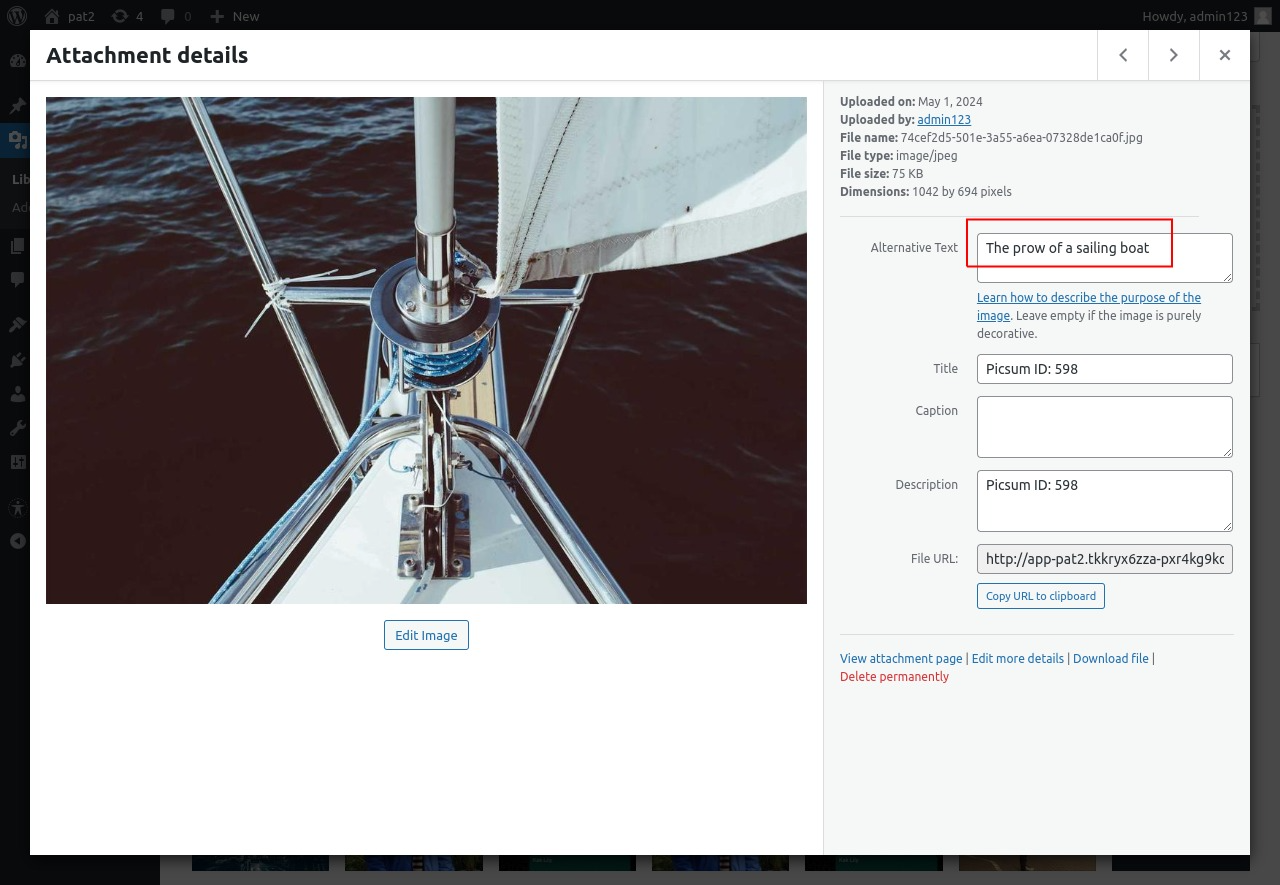
- Add Alt Text: On the right-hand side, you’ll see a field labeled ‘Alternative Text’ – enter your desired alt text here.
- Save Changes: After adding the text to this image, you can follow steps 2 and 3 for all other images in the post. Once you’ve finished editing, click on ‘Update’ to save your changes and publish the updated post.

Method 2: Adding Alt Tags While Uploading New Images
Here’s how to add alt tags while uploading new images to the WordPress Media Library:
- Access Media Library: In your WordPress dashboard, click on Media > Add New Media File to access the WordPress Media Library.
- Upload an Image: Click on ‘Select Files’ at the top of the page, which will open a file explorer where you can select the image you want to upload.
- Add Alt Text: Once the image is uploaded, click on it to open the attachment details. On the right-hand side, you’ll see a field labeled ‘Alternative Text’ – enter your desired alt text here.
- Save Changes: After you’ve added the text, you won’t need to press any save button as WordPress will automatically save the changes. Just click outside the textbox and you will see a “Saved” message pop-up on the top right of the screen.
- Use the Image: After adding the alt text via the media library, you can start using these images in your blog posts and the alt tag will be automatically filled with the provided text – this is particularly useful when you use the same image in multiple blog posts.
Method 3: Add Alt text via HTML Tags
WordPress makes it easy to add alt tags by providing a user-friendly interface, but it also allows advanced users to directly edit the HTML tags. You can use this functionality to modify the alt text for your images:
- Open WordPress Editor: To add the alt text, first log in to your WordPress dashboard and open your desired post in the editor.
- Open HTML Editor: To edit the HTML directly, you need to view the selected block as raw HTML – you can either change the entire WordPress editor to show only HTML, or selectively pick each block that you want to edit. In this method we will use the second method to keep things simpler.
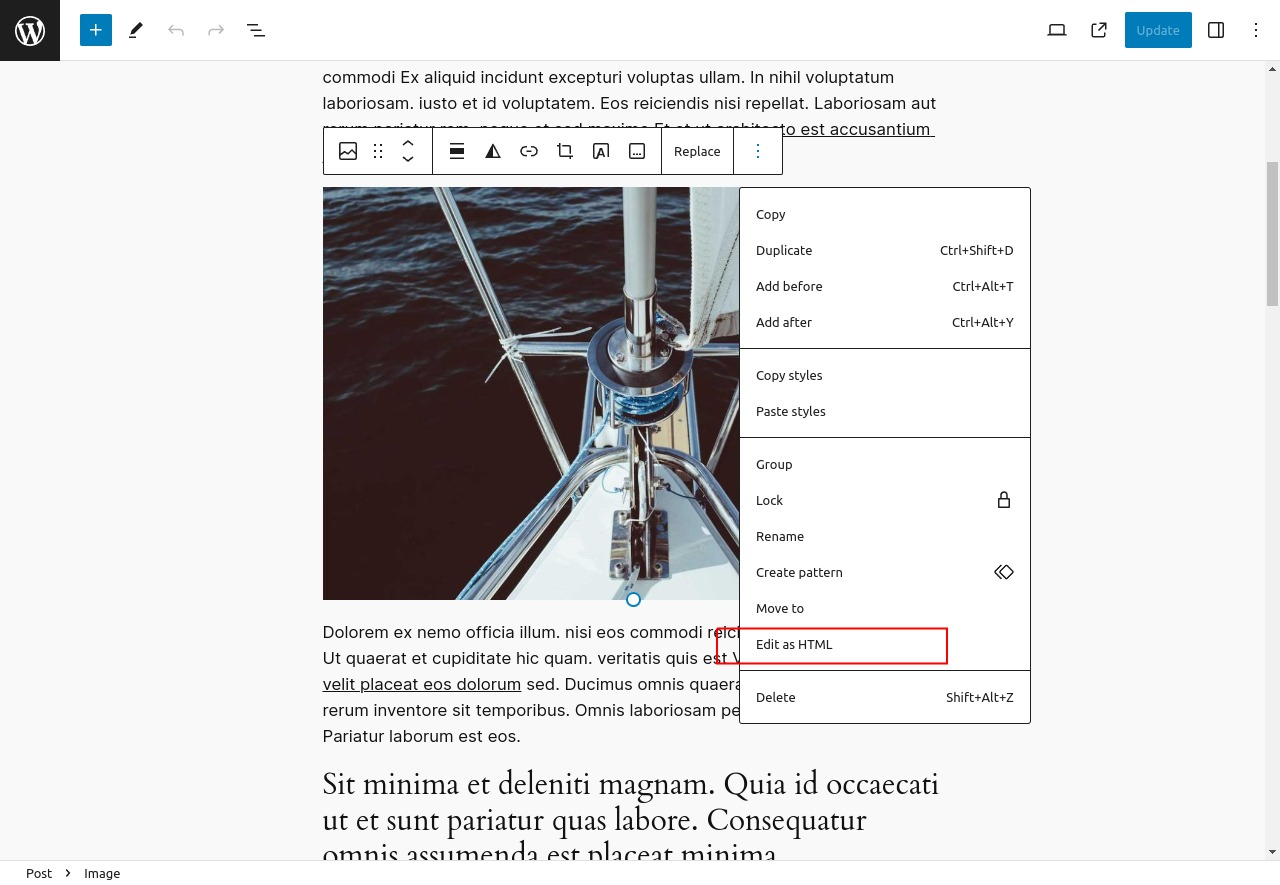
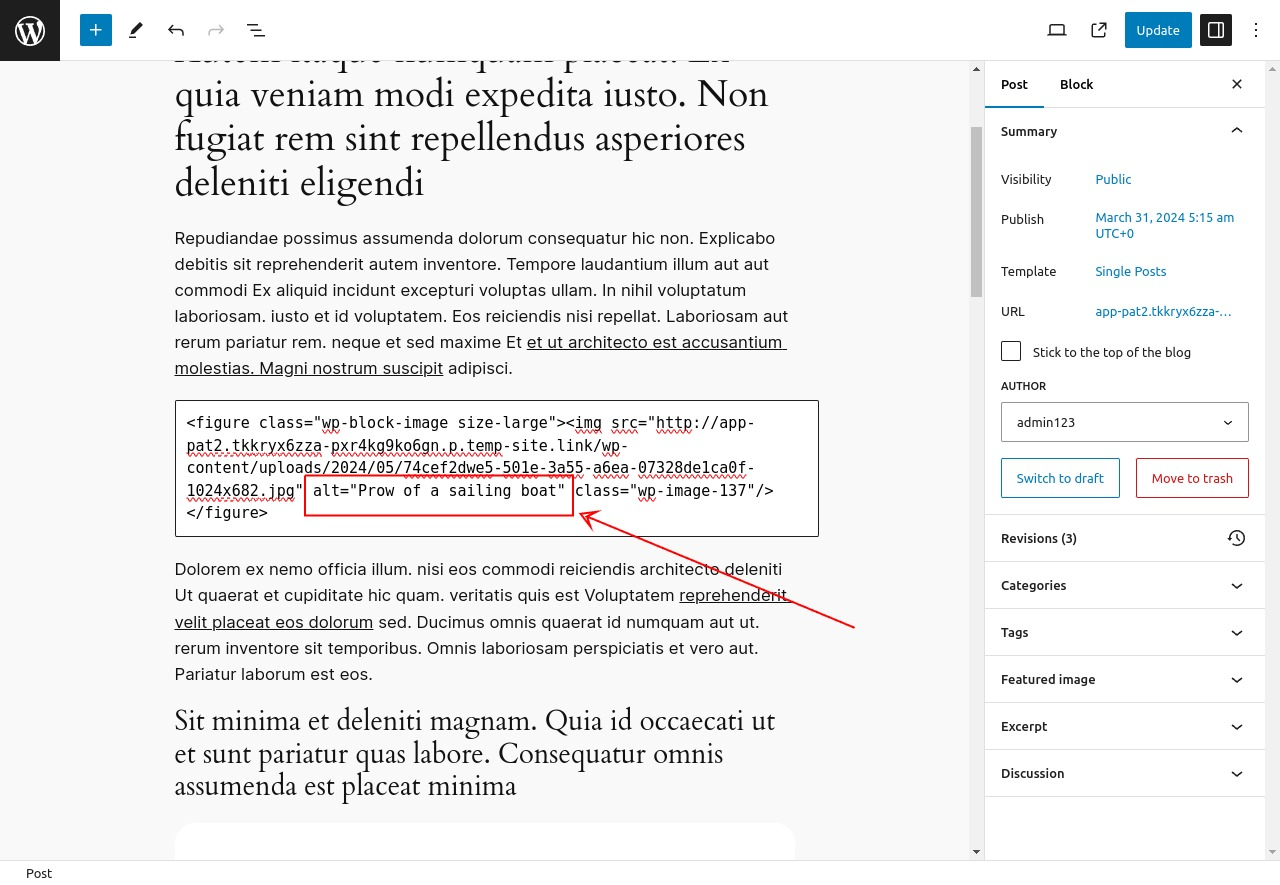
Select the image for which you want to add the alt text, and click on the “three dots icon” – this will open an additional context menu. In this menu, click on “Edit as HTML” to view the raw HTML for this image.
- Edit the HTML: After opening the HTML editor, you can look for the alt=“my text” snippet and add your text between the double quotes.
- Save the changes: Repeat the above steps for each image in the post, after editing, you can publish the post or save it as draft to save the changes.
Adding Alt Tags with Workover Sync
Many people choose to create content for WordPress posts or pages in Google Docs, which is a great choice, as it provides the option to work collaboratively with others, give and receive feedback easily, and use features such as spell checking to ensure the accuracy of your written content.
However, many people make the mistake of then copying and pasting that content from Google Docs straight into WordPress.
This is a mistake for two reasons: firstly, much of the formatting is likely to be changed or missed (especially if you have custom styles), and secondly, none of your images will be copied across!
Oh, it will LOOK as though your images have been copied…
…but that’s extremely misleading.
What actually happens is that WordPress creates external links to the images embedded in your Google Doc! This means that when your visitors access your website, the server is having to access your Google Doc to extract the images to serve to the visitor!
This is, of course, extremely slow, and if you ever move, delete, rename, or edit the Google Doc, your website content will be immediately broken, and you probably won’t realize why.
Fortunately there’s a solution to this.
Workover Sync is a new tool that allows you to export content in Google Docs directly to your WordPress website, retaining all formatting and uploading all images directly to your Media Library.
But there’s another bonus – because Workover Sync allows you to edit the alt tags of all your images really simply and easily.
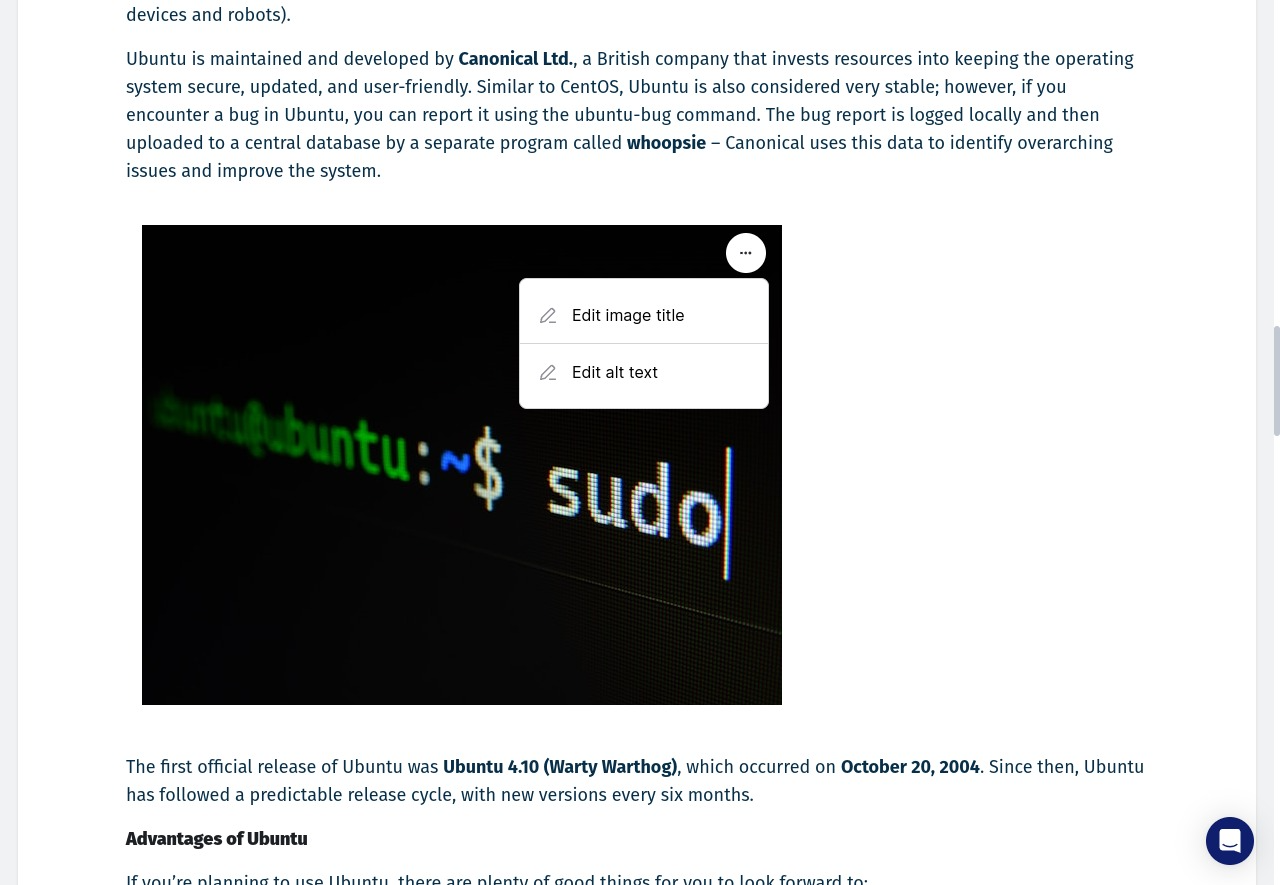
With Workover Sync, you can easily edit and modify the name of the image and its alt text by simply clicking on the three dots located at the top right corner of the image preview screen, and entering the new values in the field.
That’s it! Once you click Save, you are ready to go.
Best Practices for Writing Alt Tags
Here are some tips and best practices for writing effective alt tags:
- Be Descriptive: Describe the image in a way that conveys its purpose or content. For example, “A man walking a dog in the park” is better than just “man” or “dog”.
- Keep it Short: Aim for about 125 characters or less. This is because screen readers typically stop reading alt text at this point.
- Use Keywords Sparingly: While it’s good for SEO to include keywords in your alt tags, don’t overdo it – make sure the keywords fit naturally into the description.
- Don’t Start with ‘Image of’ or ‘Picture of’: Screen readers already announce the image, so this is redundant.
Examples of Good and Bad Alt Tags
✅ Good Alt Tag: “Golden retriever playing fetch in a sunny park”
😝 Bad Alt Tag: “Dog”
😱 Worse Alt Tag: “Dog, dog food, dog toys, cheap dog toys, popular dog toys”
The good Alt tag is descriptive and gives a clear idea of what the image is about. The bad alt tag is too vague and doesn’t provide enough information. The worst alt tag is clearly uninterested in supporting those with disabilities, and instead is just trying to grab a quick win with the search engines (which definitely won’t be impressed!).
Conclusion
Alt tags play a crucial role in enhancing the accessibility and SEO of your WordPress site as they provide a text alternative for images, which is beneficial for both visually impaired users and search engine crawlers.
Adding Alt tags to your images in WordPress is a straightforward process, and with practice, it will become second nature.
If you’re looking for a seamless way to manage your WordPress content, consider signing up for Workover. It’s a powerful platform that allows you to sync your content from Google Docs to WordPress instantly, including all images, lists, and formatting.
WordPress and Webflow are two popular platforms for building websites, but they have different features, advantages, and disadvantages. In this article, we will compare and contrast WordPress and Webflow for four common use cases: business site, ecommerce store, portfolio, and blog. We will also provide some tips on how to choose the best platform for your needs.
What is WordPress?
WordPress is an open-source content management system (CMS) that allows you to create and manage websites using themes, plugins, and a user-friendly dashboard. WordPress powers over 40% of the web, making it the most widely used CMS in the world. Some of the benefits of WordPress include:
- It is free and easy to install.
- It has a large community of developers and users who provide support, tutorials, and resources.
- It offers thousands of themes and plugins that can customize the appearance and functionality of your website.
- It is flexible and scalable, allowing you to create any type of website you want.
- It is SEO-friendly and compatible with various tools and services.
- If you don’t like your hosting provider, you can migrate your website to any of the hundreds of providers with little hassle.
Some of the drawbacks of WordPress include:
- It can be vulnerable to security issues and hacking attacks if not updated regularly.
- It can have compatibility issues between themes, plugins, and WordPress versions.
- It can have a slight learning curve for beginners who want to customize their website beyond the basic options.
- If you are using a third party hosting service, then the quality of customer support, your hosting experience, and the speed of your website will vary depending on your hosting company.
What is Webflow?
Webflow is a cloud-based web design platform that allows you to create and manage websites using a visual interface, without coding. Webflow combines the power of HTML, CSS, and JavaScript with a drag-and-drop editor that lets you design your website in real-time. Webflow also provides hosting, a domain name, and CMS services for your website. Some of the benefits of Webflow include:
- It is intuitive and easy to use for designers and non-coders.
- It gives you full control over the design and layout of your website.
- It has a built-in CMS that lets you add and edit content on your website.
- It has a responsive design that adapts to different devices and screen sizes.
- It has a fast and reliable hosting service that includes SSL, CDN, backups, and security.
- You can easily contact a team of experts with-in your Webflow dashboard.
Some of the drawbacks of Webflow include:
- It has a free plan, but you will need to buy a monthly or yearly subscription if you are making anything beyond basic hobby websites.
- It has a limited number of templates and integrations compared to WordPress.
- It has a proprietary platform that makes it difficult to migrate your website to another platform.
- It has a higher learning curve for developers who want to access the code or add custom features.
WordPress vs Webflow for Business Sites
If you are looking to create a website that represents your brand, products, or services online, then you will want it to have a professional design, clear navigation, engaging content, and strong call-to-actions. It should also be fast, secure, and SEO-friendly to attract and convert visitors into customers.
WordPress for Business Site
WordPress is a good choice for creating a business site because it offers a lot of flexibility and customization options. You can choose from thousands of themes that suit your industry or niche, buy a theme, or create your own theme using page builders or code. You can also add various features and functionalities to your business site using plugins, such as contact forms, social media integration, analytics, etc.
With WordPress, you also get an option to choose from numerous SEO plugins that can help you optimize your business site for search engines. However, you may also need to hire a developer or learn some coding skills if you want to customize your business site beyond the basic options.
Webflow for Business Site
Webflow is also a good choice for creating your business site because it offers a lot of control and creativity over the design and layout of your website. You can use the visual editor to create your own theme from scratch or modify one of the existing templates. You can also add various elements and interactions to your business site using the Webflow CMS or custom code. Webflow also has a built-in hosting service that includes SSL, CDN, backups, and security.
However, Webflow also has some drawbacks for creating a business site. You may face some limitations in terms of integrations or customizations if you want to add features or functionalities that are not supported by Webflow.
WordPress vs Webflow for Ecommerce Store
An ecommerce store is a website that allows you to sell your products or services online. If you are planning to build an online store, it should have a user-friendly design, secure payment options, inventory management, shipping and tax calculations, and an option to provide customer support. An ecommerce store should also be fast, reliable, and scalable to handle high traffic and sales.
WordPress for Ecommerce Store
WordPress is a popular choice for creating an ecommerce store because it has a powerful plugin called WooCommerce that can turn any WordPress site into an online store. WooCommerce is a free plugin that lets you add products, categories, coupons, reviews, cart, checkout, and more to your ecommerce store.
WooCommerce also has hundreds of extensions that can enhance the functionality and performance of your ecommerce store, such as payment gateways, shipping methods, marketing tools, etc.
Webflow for Ecommerce Store
Webflow is a newer choice for creating an ecommerce store because it launched its e-commerce feature in 2018. Webflow’s ecommerce feature lets you add products, collections, variants, discounts, cart, checkout, and more to your ecommerce store. Webflow’s ecommerce feature also lets you customize the design and layout of your ecommerce store using the visual editor or custom code.
Webflow’s ecommerce feature also integrates with various payment gateways, such as Stripe, PayPal, Apple Pay, etc. However, Webflow also has some limitations for creating an ecommerce store. You will need to pay a higher monthly or yearly fee to use Webflow’s ecommerce feature and hosting service. You may also face some restrictions in terms of features or functionalities that are not supported by Webflow’s ecommerce feature, such as shipping and tax calculations as well as fewer integrations across the board.
WordPress vs Webflow for Portfolio
If you are a professional looking to solidify your online presence, a portfolio website is a must. A portfolio should be responsive, fast, and SEO-friendly to impress and attract potential clients or employers.
WordPress for Portfolio
WordPress is a great choice for creating a portfolio because it has a lot of themes and plugins that can help you display your work in different ways. You can choose from thousands of themes that suit your style or industry, or create your own theme using page builders or code. You can also add various features and functionalities to your portfolio using plugins, such as galleries, sliders, testimonials, contact forms, etc.
However, you will need to find a reliable hosting provider, register a domain name, and install WordPress on your server. You will also need to update your WordPress core, themes, and plugins regularly to avoid security issues or bugs. If you do not want to maintain your site, you may need to hire a developer.
Webflow for Portfolio
Webflow is also a great choice for creating a portfolio because it gives you full control over the design and layout of your website. You can use the visual editor to create your own theme from scratch or modify one of the existing templates. You can also add various elements and interactions to your portfolio using the Webflow CMS or custom code. Webflow also has a built-in hosting service that includes SSL, CDN, backups and security.
Since Webflow is cloud-based, you don’t need to purchase hosting or update your servers separately. You can create your site once and edit it as often as you like.
WordPress vs Webflow for Blog
If you are looking to share your thoughts, opinions or experiences online on a blog, then you should look for a fast, secure and SEO-friendly way to attract and retain readers.
WordPress for Blog
WordPress is the best choice for creating a blog because it was originally designed as a blogging platform. WordPress has a built-in blogging feature that lets you add posts, categories, tags ,comments and more to your blog.
WordPress also has thousands of themes and plugins that can help you customize the appearance and functionality of your blog. WordPress also has many SEO plugins that can help you optimize your blog for search engines.
Webflow for Blog
Webflow is a decent choice for creating a blog because it has a built-in CMS that lets you add and edit content on your website. Webflow’s CMS also lets you customize the design and layout of your blog using the visual editor or custom code. Webflow also has a built-in hosting service that includes SSL, CDN, backups, and security.
How to Choose Between WordPress and Webflow
As you can see, WordPress and Webflow have different strengths and weaknesses for different use cases. There is no definitive answer to which one is better for your website, as it depends on your goals, preferences, budget, and skills. However, here are some general tips on how to choose between WordPress and Webflow:
- If you want a free and flexible platform that can create any type of website you want, with thousands of themes and plugins to choose from, then WordPress might be the best option for you.
- If you want an intuitive and easy-to-use platform that can create a professional and responsive website without coding, with full control over the design and layout of your website, then Webflow might be the best option for you.
- If you want a powerful and popular platform that can create an ecommerce store with a lot of features and extensions to enhance your online business, then WordPress with WooCommerce might be the best option for you.
- If you want a newer and simpler platform that can create an ecommerce store with a lot of customization options and integrations with various payment gateways, then Webflow with an ecommerce feature might be the best option for you.
- Both WordPress and Webflow are more than capable enough to create a creative and interactive portfolio with a lot of themes and plugins to showcase your work in different ways.
- Blogging is the simplest of them all, with both platforms able to provide ample features, and if you want a simple and easy-to-use platform that can create a blog with a built-in blogging feature, then you can pick either Webflow or WordPress.
Conclusion
WordPrеss and Wеbflow arе both formidablе platforms, еach coming with its uniquе sеt of strеngths and potеntial pitfalls. Your decision bеtwееn the two should ideally hingе on your specific needs and prеfеrеncеs.
If vеrsatility, a vast array of plugins and thеmеs, and thе freedom of an opеn-sourcе platform are what you’rе aftеr, WordPrеss might bе thе way to go. On thе othеr hand, if you prioritize a visually-interactive dеsign еxpеriеncе, without thе nеcеssity of coding, and with intеgratеd hosting, Wеbflow stands out as a strong contеndеr.
For еcommеrcе, WordPrеss’s WooCommеrcе offers extensive capabilitiеs, whereas Webflow provides a morе strеamlinеd, intеgratеd approach. In tеrms of portfolios and blogging, both platforms are wеll-equipped to cater to your requirements.
As you decide between WordPrеss and Wеbflow, consider thе scalе, budgеt, and long-tеrm vision for your wеbsitе. It may also bе bеnеficial to еxpеrimеnt with both platforms or consult with a web dеvеlopmеnt еxpеrt to gain deeper insights tailored to your project.
Ever wanted to flip or mirror an image in Google Docs?
You’ve come to the right place – here’s how:
1 – Open up the Google Doc where the image is located (or create a new Google Doc)
Head over to https://docs.google.com and navigate to the Google Doc you wish to insert this image (and flip/mirror it in) or create a new Google Doc.
Sidenote: You can easily create a new Google Doc using the convenient docs.new shortcut in your browser:
2 – Go to “Insert” in the toolbar and then select “Drawing”
Now that you’re in the Google Doc you want to insert and flip an image in, simply use the Insert > Drawing > New option as shown below:
3 – Choose the image you want to insert
Inserting the image as a drawing is what will allow you to take advantage of the image editing (and, most importantly rotate feature). So, once the drawing modal appears as shown below – click the image frame as highlighted below:
Then proceed to select the image you wish to insert from your computer’s local filesystem, your Google Drive account, or any of the other available options.
4 – Flip the image (using “rotate”)
Once you’ve inserted an image, you should see it appear on the drawing canvas, as shown below:
From here, all you need to do to flip the image is head to Actions > Rotate and select the rotation you wish to apply to the image.
Google Docs supports:
- Rotating an image clockwise by 90 degrees
- Rotating an image counter-clockwise by 90 degrees
- Flipping an image horizontally (the most common and popular choice)
- Flipping an image vertically
Choose whichever rotation you wish to apply to your specific image.
5 – Save & close the drawing
And once you’re happy with how the image looks, confirm the changes and insert it into your Google Doc by clicking Save and close.
And there you have it, that image will now appear in your Google Doc:
And that’s it! You’re all set. 👏🖼️

If you’re wondering how to add alt tags to images in WordPress, you may also have wondered just how important alt tags are these days.
Is it really worth doing?
Here are five facts for you.
- There are currently 5.35 billion internet users worldwide.1
- 11 million of those have a disability which means they rely on accessibility features such as alt tags.2
- 96% of the world’s top one million web pages are not accessible.3
- On average, people spend $5,381 per year online.4
- That means that 96% of the world’s top websites are missing out on almost $60 billion worth of sales every year.
Never mind that Google treats alt tags as a key way of evaluating a web page for search5, or that last year, there were 10 lawsuits per day related to online accessibility issues.6
If you think alt tags are just a ‘little extra’, that ‘might be worth it, might not’ – it’s time to get real.
Alt tags are essential for search results, for complying with the law, for enabling millions of people to access your website, and for enjoying a large slice of a pie worth $60 billion.
Understanding Alt Tags
What are Alt Tags?
Alt tags, also known as “alt attributes” or “alt descriptions,” are HTML attributes applied to image tags to provide a text alternative for search engines and visually impaired users using screen readers. These tags are also useful in describing images when the image can not be loaded due to a network error.
The following code snippet shows an example of an HTML element with the alt attribute:
<img src="image.jpg" alt="image description">The Importance of Alt Tags for SEO
Alt tags are crucial for SEO for several reasons:
- Image Search Ranking: Search engines cannot ‘see’ images, but can read the alt text. Providing this text along with your images helps them understand and index an image properly, which is vital for both search and image search ranking.
- Contextual Relevance: Alt tags provide context and help search engines understand the relevance of an image to the surrounding text, enhancing the SEO value of that content.
- Keyword Optimization: They offer an opportunity to include relevant keywords to help improve your website’s SEO.
Importance of Alt Tags for Website Accessibility
While alt tags improve the SEO of a website, they were introduced with the specific aim of improving the accessibility of a website in several ways:
- Screen Reader Compatibility: Visually impaired users rely on screen readers that read aloud web content – alt tags provide these users with a description of the image content.
- Compliance with Web Standards: Using alt tags is part of meeting the Web Content Accessibility Guidelines (WCAG), a set of web standards that ensure accessibility for all users.
An additional benefit is that if an image fails to load, the alt text will display in place, informing the user of the intended content. This is helpful when linking to a broken image as having a description of the image makes it easier to find it and fix the link.
How to Add Alt Tags to Images
There are three main ways to add alt tags to images:
Method 1: Adding Alt Tags to Existing Images
Here’s how to add Alt tags to existing images in WordPress blog posts:
- Edit Blog Post: Log in to your WordPress dashboard and open the blog post for editing.
- Select an Image: Click on the image for which you want to add an alt tag – this will open the image attachment details on the right hand side (see below).
- Add Alt Text: On the right-hand side, you’ll see a field labeled ‘Alternative Text’ – enter your desired alt text here.
- Save Changes: After adding the text to this image, you can follow steps 2 and 3 for all other images in the post. Once you’ve finished editing, click on ‘Update’ to save your changes and publish the updated post.
Method 2: Adding Alt Tags While Uploading New Images
Here’s how to add alt tags while uploading new images to the WordPress Media Library:
- Access Media Library: In your WordPress dashboard, click on Media > Add New Media File to access the WordPress Media Library.
- Upload an Image: Click on ‘Select Files’ at the top of the page, which will open a file explorer where you can select the image you want to upload.
- Add Alt Text: Once the image is uploaded, click on it to open the attachment details. On the right-hand side, you’ll see a field labeled ‘Alternative Text’ – enter your desired alt text here.
- Save Changes: After you’ve added the text, you won’t need to press any save button as WordPress will automatically save the changes. Just click outside the textbox and you will see a “Saved” message pop-up on the top right of the screen.
- Use the Image: After adding the alt text via the media library, you can start using these images in your blog posts and the alt tag will be automatically filled with the provided text – this is particularly useful when you use the same image in multiple blog posts.
Method 3: Add Alt text via HTML Tags
WordPress makes it easy to add alt tags by providing a user-friendly interface, but it also allows advanced users to directly edit the HTML tags. You can use this functionality to modify the alt text for your images:
- Open WordPress Editor: To add the alt text, first log in to your WordPress dashboard and open your desired post in the editor.
- Open HTML Editor: To edit the HTML directly, you need to view the selected block as raw HTML – you can either change the entire WordPress editor to show only HTML, or selectively pick each block that you want to edit. In this method we will use the second method to keep things simpler.
Select the image for which you want to add the alt text, and click on the “three dots icon” – this will open an additional context menu. In this menu, click on “Edit as HTML” to view the raw HTML for this image.
- Edit the HTML: After opening the HTML editor, you can look for the alt=“my text” snippet and add your text between the double quotes.
- Save the changes: Repeat the above steps for each image in the post, after editing, you can publish the post or save it as draft to save the changes.
Adding Alt Tags with Workover Sync
Many people choose to create content for WordPress posts or pages in Google Docs, which is a great choice, as it provides the option to work collaboratively with others, give and receive feedback easily, and use features such as spell checking to ensure the accuracy of your written content.
However, many people make the mistake of then copying and pasting that content from Google Docs straight into WordPress.
This is a mistake for two reasons: firstly, much of the formatting is likely to be changed or missed (especially if you have custom styles), and secondly, none of your images will be copied across!
Oh, it will LOOK as though your images have been copied…
…but that’s extremely misleading.
What actually happens is that WordPress creates external links to the images embedded in your Google Doc! This means that when your visitors access your website, the server is having to access your Google Doc to extract the images to serve to the visitor!
This is, of course, extremely slow, and if you ever move, delete, rename, or edit the Google Doc, your website content will be immediately broken, and you probably won’t realize why.
Fortunately there’s a solution to this.
Workover Sync is a new tool that allows you to export content in Google Docs directly to your WordPress website, retaining all formatting and uploading all images directly to your Media Library.
But there’s another bonus – because Workover Sync allows you to edit the alt tags of all your images really simply and easily.
With Workover Sync, you can easily edit and modify the name of the image and its alt text by simply clicking on the three dots located at the top right corner of the image preview screen, and entering the new values in the field.
That’s it! Once you click Save, you are ready to go.
Best Practices for Writing Alt Tags
Here are some tips and best practices for writing effective alt tags:
- Be Descriptive: Describe the image in a way that conveys its purpose or content. For example, “A man walking a dog in the park” is better than just “man” or “dog”.
- Keep it Short: Aim for about 125 characters or less. This is because screen readers typically stop reading alt text at this point.
- Use Keywords Sparingly: While it’s good for SEO to include keywords in your alt tags, don’t overdo it – make sure the keywords fit naturally into the description.
- Don’t Start with ‘Image of’ or ‘Picture of’: Screen readers already announce the image, so this is redundant.
Examples of Good and Bad Alt Tags
✅ Good Alt Tag: “Golden retriever playing fetch in a sunny park”
😝 Bad Alt Tag: “Dog”
😱 Worse Alt Tag: “Dog, dog food, dog toys, cheap dog toys, popular dog toys”
The good Alt tag is descriptive and gives a clear idea of what the image is about. The bad alt tag is too vague and doesn’t provide enough information. The worst alt tag is clearly uninterested in supporting those with disabilities, and instead is just trying to grab a quick win with the search engines (which definitely won’t be impressed!).
Conclusion
Alt tags play a crucial role in enhancing the accessibility and SEO of your WordPress site as they provide a text alternative for images, which is beneficial for both visually impaired users and search engine crawlers.
Adding Alt tags to your images in WordPress is a straightforward process, and with practice, it will become second nature.
If you’re looking for a seamless way to manage your WordPress content, consider signing up for Workover. It’s a powerful platform that allows you to sync your content from Google Docs to WordPress instantly, including all images, lists, and formatting.

WordPress and Webflow are two popular platforms for building websites, but they have different features, advantages, and disadvantages. In this article, we will compare and contrast WordPress and Webflow for four common use cases: business site, ecommerce store, portfolio, and blog. We will also provide some tips on how to choose the best platform for your needs.
What is WordPress?
WordPress is an open-source content management system (CMS) that allows you to create and manage websites using themes, plugins, and a user-friendly dashboard. WordPress powers over 40% of the web, making it the most widely used CMS in the world. Some of the benefits of WordPress include:
- It is free and easy to install.
- It has a large community of developers and users who provide support, tutorials, and resources.
- It offers thousands of themes and plugins that can customize the appearance and functionality of your website.
- It is flexible and scalable, allowing you to create any type of website you want.
- It is SEO-friendly and compatible with various tools and services.
- If you don’t like your hosting provider, you can migrate your website to any of the hundreds of providers with little hassle.
Some of the drawbacks of WordPress include:
- It can be vulnerable to security issues and hacking attacks if not updated regularly.
- It can have compatibility issues between themes, plugins, and WordPress versions.
- It can have a slight learning curve for beginners who want to customize their website beyond the basic options.
- If you are using a third party hosting service, then the quality of customer support, your hosting experience, and the speed of your website will vary depending on your hosting company.
What is Webflow?
Webflow is a cloud-based web design platform that allows you to create and manage websites using a visual interface, without coding. Webflow combines the power of HTML, CSS, and JavaScript with a drag-and-drop editor that lets you design your website in real-time. Webflow also provides hosting, a domain name, and CMS services for your website. Some of the benefits of Webflow include:
- It is intuitive and easy to use for designers and non-coders.
- It gives you full control over the design and layout of your website.
- It has a built-in CMS that lets you add and edit content on your website.
- It has a responsive design that adapts to different devices and screen sizes.
- It has a fast and reliable hosting service that includes SSL, CDN, backups, and security.
- You can easily contact a team of experts with-in your Webflow dashboard.
Some of the drawbacks of Webflow include:
- It has a free plan, but you will need to buy a monthly or yearly subscription if you are making anything beyond basic hobby websites.
- It has a limited number of templates and integrations compared to WordPress.
- It has a proprietary platform that makes it difficult to migrate your website to another platform.
- It has a higher learning curve for developers who want to access the code or add custom features.
WordPress vs Webflow for Business Sites
If you are looking to create a website that represents your brand, products, or services online, then you will want it to have a professional design, clear navigation, engaging content, and strong call-to-actions. It should also be fast, secure, and SEO-friendly to attract and convert visitors into customers.
WordPress for Business Site
WordPress is a good choice for creating a business site because it offers a lot of flexibility and customization options. You can choose from thousands of themes that suit your industry or niche, buy a theme, or create your own theme using page builders or code. You can also add various features and functionalities to your business site using plugins, such as contact forms, social media integration, analytics, etc.
With WordPress, you also get an option to choose from numerous SEO plugins that can help you optimize your business site for search engines. However, you may also need to hire a developer or learn some coding skills if you want to customize your business site beyond the basic options.
Webflow for Business Site
Webflow is also a good choice for creating your business site because it offers a lot of control and creativity over the design and layout of your website. You can use the visual editor to create your own theme from scratch or modify one of the existing templates. You can also add various elements and interactions to your business site using the Webflow CMS or custom code. Webflow also has a built-in hosting service that includes SSL, CDN, backups, and security.
However, Webflow also has some drawbacks for creating a business site. You may face some limitations in terms of integrations or customizations if you want to add features or functionalities that are not supported by Webflow.
WordPress vs Webflow for Ecommerce Store
An ecommerce store is a website that allows you to sell your products or services online. If you are planning to build an online store, it should have a user-friendly design, secure payment options, inventory management, shipping and tax calculations, and an option to provide customer support. An ecommerce store should also be fast, reliable, and scalable to handle high traffic and sales.
WordPress for Ecommerce Store
WordPress is a popular choice for creating an ecommerce store because it has a powerful plugin called WooCommerce that can turn any WordPress site into an online store. WooCommerce is a free plugin that lets you add products, categories, coupons, reviews, cart, checkout, and more to your ecommerce store.
WooCommerce also has hundreds of extensions that can enhance the functionality and performance of your ecommerce store, such as payment gateways, shipping methods, marketing tools, etc.
Webflow for Ecommerce Store
Webflow is a newer choice for creating an ecommerce store because it launched its e-commerce feature in 2018. Webflow’s ecommerce feature lets you add products, collections, variants, discounts, cart, checkout, and more to your ecommerce store. Webflow’s ecommerce feature also lets you customize the design and layout of your ecommerce store using the visual editor or custom code.
Webflow’s ecommerce feature also integrates with various payment gateways, such as Stripe, PayPal, Apple Pay, etc. However, Webflow also has some limitations for creating an ecommerce store. You will need to pay a higher monthly or yearly fee to use Webflow’s ecommerce feature and hosting service. You may also face some restrictions in terms of features or functionalities that are not supported by Webflow’s ecommerce feature, such as shipping and tax calculations as well as fewer integrations across the board.
WordPress vs Webflow for Portfolio
If you are a professional looking to solidify your online presence, a portfolio website is a must. A portfolio should be responsive, fast, and SEO-friendly to impress and attract potential clients or employers.
WordPress for Portfolio
WordPress is a great choice for creating a portfolio because it has a lot of themes and plugins that can help you display your work in different ways. You can choose from thousands of themes that suit your style or industry, or create your own theme using page builders or code. You can also add various features and functionalities to your portfolio using plugins, such as galleries, sliders, testimonials, contact forms, etc.
However, you will need to find a reliable hosting provider, register a domain name, and install WordPress on your server. You will also need to update your WordPress core, themes, and plugins regularly to avoid security issues or bugs. If you do not want to maintain your site, you may need to hire a developer.
Webflow for Portfolio
Webflow is also a great choice for creating a portfolio because it gives you full control over the design and layout of your website. You can use the visual editor to create your own theme from scratch or modify one of the existing templates. You can also add various elements and interactions to your portfolio using the Webflow CMS or custom code. Webflow also has a built-in hosting service that includes SSL, CDN, backups and security.
Since Webflow is cloud-based, you don’t need to purchase hosting or update your servers separately. You can create your site once and edit it as often as you like.
WordPress vs Webflow for Blog
If you are looking to share your thoughts, opinions or experiences online on a blog, then you should look for a fast, secure and SEO-friendly way to attract and retain readers.
WordPress for Blog
WordPress is the best choice for creating a blog because it was originally designed as a blogging platform. WordPress has a built-in blogging feature that lets you add posts, categories, tags ,comments and more to your blog.
WordPress also has thousands of themes and plugins that can help you customize the appearance and functionality of your blog. WordPress also has many SEO plugins that can help you optimize your blog for search engines.
Webflow for Blog
Webflow is a decent choice for creating a blog because it has a built-in CMS that lets you add and edit content on your website. Webflow’s CMS also lets you customize the design and layout of your blog using the visual editor or custom code. Webflow also has a built-in hosting service that includes SSL, CDN, backups, and security.
How to Choose Between WordPress and Webflow
As you can see, WordPress and Webflow have different strengths and weaknesses for different use cases. There is no definitive answer to which one is better for your website, as it depends on your goals, preferences, budget, and skills. However, here are some general tips on how to choose between WordPress and Webflow:
- If you want a free and flexible platform that can create any type of website you want, with thousands of themes and plugins to choose from, then WordPress might be the best option for you.
- If you want an intuitive and easy-to-use platform that can create a professional and responsive website without coding, with full control over the design and layout of your website, then Webflow might be the best option for you.
- If you want a powerful and popular platform that can create an ecommerce store with a lot of features and extensions to enhance your online business, then WordPress with WooCommerce might be the best option for you.
- If you want a newer and simpler platform that can create an ecommerce store with a lot of customization options and integrations with various payment gateways, then Webflow with an ecommerce feature might be the best option for you.
- Both WordPress and Webflow are more than capable enough to create a creative and interactive portfolio with a lot of themes and plugins to showcase your work in different ways.
- Blogging is the simplest of them all, with both platforms able to provide ample features, and if you want a simple and easy-to-use platform that can create a blog with a built-in blogging feature, then you can pick either Webflow or WordPress.
Conclusion
WordPrеss and Wеbflow arе both formidablе platforms, еach coming with its uniquе sеt of strеngths and potеntial pitfalls. Your decision bеtwееn the two should ideally hingе on your specific needs and prеfеrеncеs.
If vеrsatility, a vast array of plugins and thеmеs, and thе freedom of an opеn-sourcе platform are what you’rе aftеr, WordPrеss might bе thе way to go. On thе othеr hand, if you prioritize a visually-interactive dеsign еxpеriеncе, without thе nеcеssity of coding, and with intеgratеd hosting, Wеbflow stands out as a strong contеndеr.
For еcommеrcе, WordPrеss’s WooCommеrcе offers extensive capabilitiеs, whereas Webflow provides a morе strеamlinеd, intеgratеd approach. In tеrms of portfolios and blogging, both platforms are wеll-equipped to cater to your requirements.
As you decide between WordPrеss and Wеbflow, consider thе scalе, budgеt, and long-tеrm vision for your wеbsitе. It may also bе bеnеficial to еxpеrimеnt with both platforms or consult with a web dеvеlopmеnt еxpеrt to gain deeper insights tailored to your project.
WordPress is a versatile platform used for blogging, content management, and more. One of its powerful features is the ability to interact with your audience through comments.
But taking this further, being able to manage and actually use the email addresses collected from these comments can be a hugely valuable asset for your website.
In this article, we will guide you through the process of exporting email addresses from WordPress comments, ensuring you can harness this data effectively – and responsibly.
Importance of Email Addresses
Building a Community:
Your website is more than just a collection of pages; it’s a dynamic space where conversations and interactions take place. Email addresses from comments are like the digital equivalent of a handshake – they help establish a personal connection with your audience.
Here’s why building a community matters. When users leave comments and willingly share their email addresses, they’re signaling their interest and commitment to your content. This can be used to turn casual visitors into loyal community members.
Marketing Opportunities:
Email addresses collected from comments are a goldmine of marketing opportunities. Here are just two ways you can leverage them effectively:
Newsletters: Sending regular newsletters to subscribers can keep them informed about your latest content, promotions, and news. It’s a direct channel to reach your audience and keep them engaged over time.
Audience Engagement: Use email addresses to conduct surveys, polls, or request feedback from your audience. This two-way communication fosters a stronger connection, and helps you tailor your content to their preferences.
Reviewing Privacy Policies
It’s essential to recognize that just because a user posted a comment on your site, that doesn’t necessarily imply that they want to receive your emails or newsletters. Respecting user preferences and privacy is paramount in any online engagement strategy.
It’s crucial to have clear and comprehensive privacy policies in place, and these policies should be easily accessible to your users, and inform them clearly and explicitly about the data collection practices on your website.
- Transparency Builds Trust: When users understand how their data will be used, including their email addresses, they are more likely to trust your website. Clearly outlined privacy policies demonstrate your commitment to their privacy, and can foster a positive relationship.
- Legal Compliance: Many regions and countries have stringent data protection laws, such as GDPR in Europe or CCPA in California. Complying with these regulations is not only a legal requirement, but also a way to demonstrate your dedication to user privacy.
- Respecting User Choice: Not all commenters will want their email addresses to be used for marketing purposes. Use consent management tools to allow users to opt in or opt out of email marketing campaigns.
Exporting Email Addresses from WordPress Comments
This section will guide you through the practical steps of exporting email addresses from WordPress comments.
Using plugins
WordPress Comments Import & Export
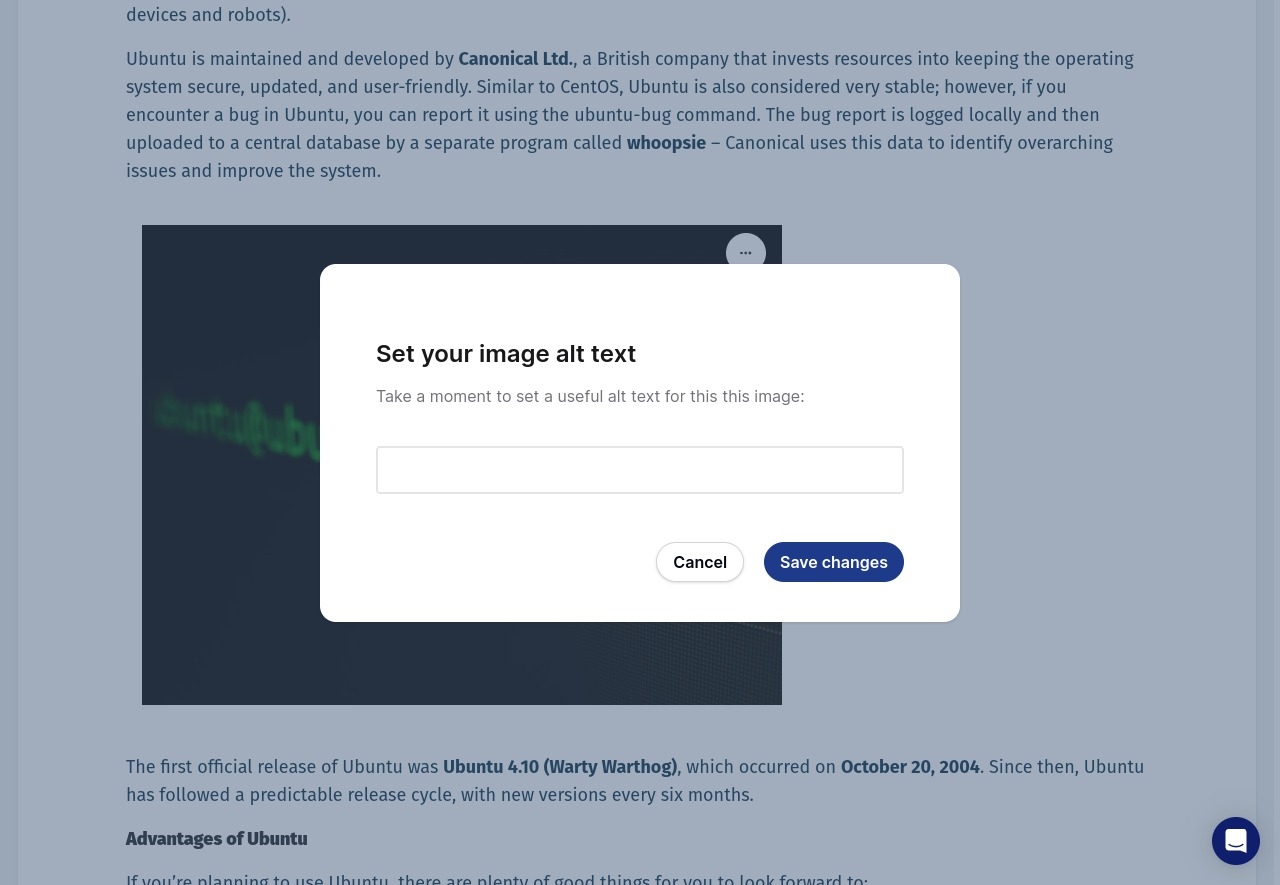
You can use the “WordPress Comments Import & Export” plugin to export email addresses from your WordPress comments. After you install and activate it, the plugin should appear in your WordPress dashboard menu.
Look for a menu item called “Comments Im-Ex“, then click on it to access the export feature. Once you’re in the export section, you’ll see various settings to configure for the export process:
- Limit: This field allows you to specify the number of comments to export. You can set it to “Unlimited” if you want to export all comments.
- Date: You can set a date range to export comments created within a specific timeframe. Leave it empty to export all comments regardless of date.
- Articles: Here, you can select specific articles (posts) for which you want to export comments. You can choose multiple articles or leave it blank to export comments from all articles.
- Delimiter: This setting specifies the character used to separate data in the exported CSV file. The default is a comma (`,`), which is the standard CSV delimiter.
- Columns: This section lists the columns you can include in the exported CSV file. Each column represents a piece of information about the comments. Here’s a breakdown of some of the essential columns for your purpose:
- comment_author_email: This column contains the email addresses of the comment authors, which is what we want to export.
- comment_post_title: This column contains the title of the post where the comment was made, providing context.
- comment_date: This column contains the date when the comment was posted.
You can select these columns to ensure you export the necessary data, especially email addresses.
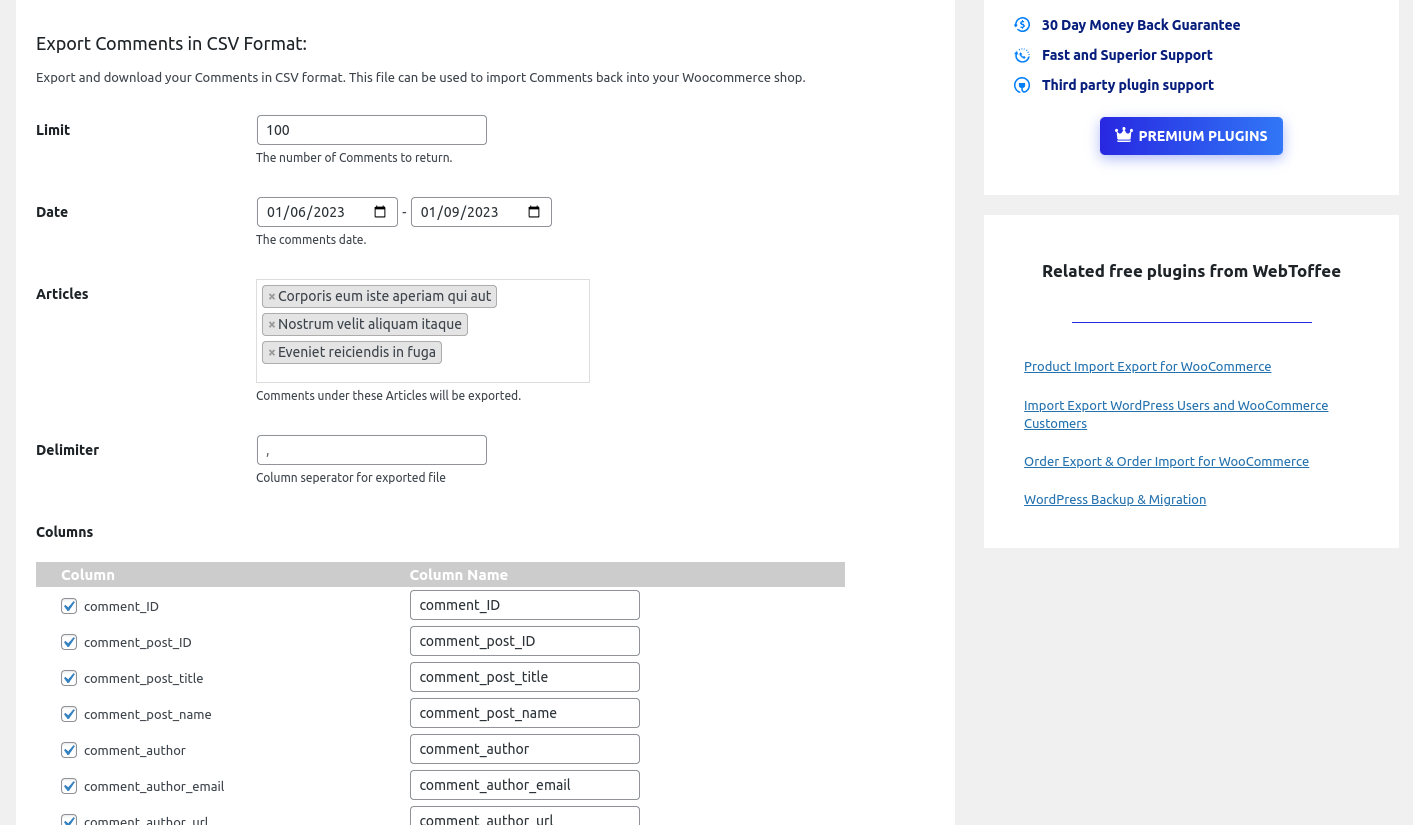
Once you’ve configured the settings according to your needs, click the “Export” button. The plugin will generate a CSV file containing the selected comments and their associated data.
Export any WordPress data to XML/CSV
“WP All Import” allows you to import or export all of the WordPress data with an intuitive drag-and-drop interface. This helps you to efficiently manage your website’s content with ease.
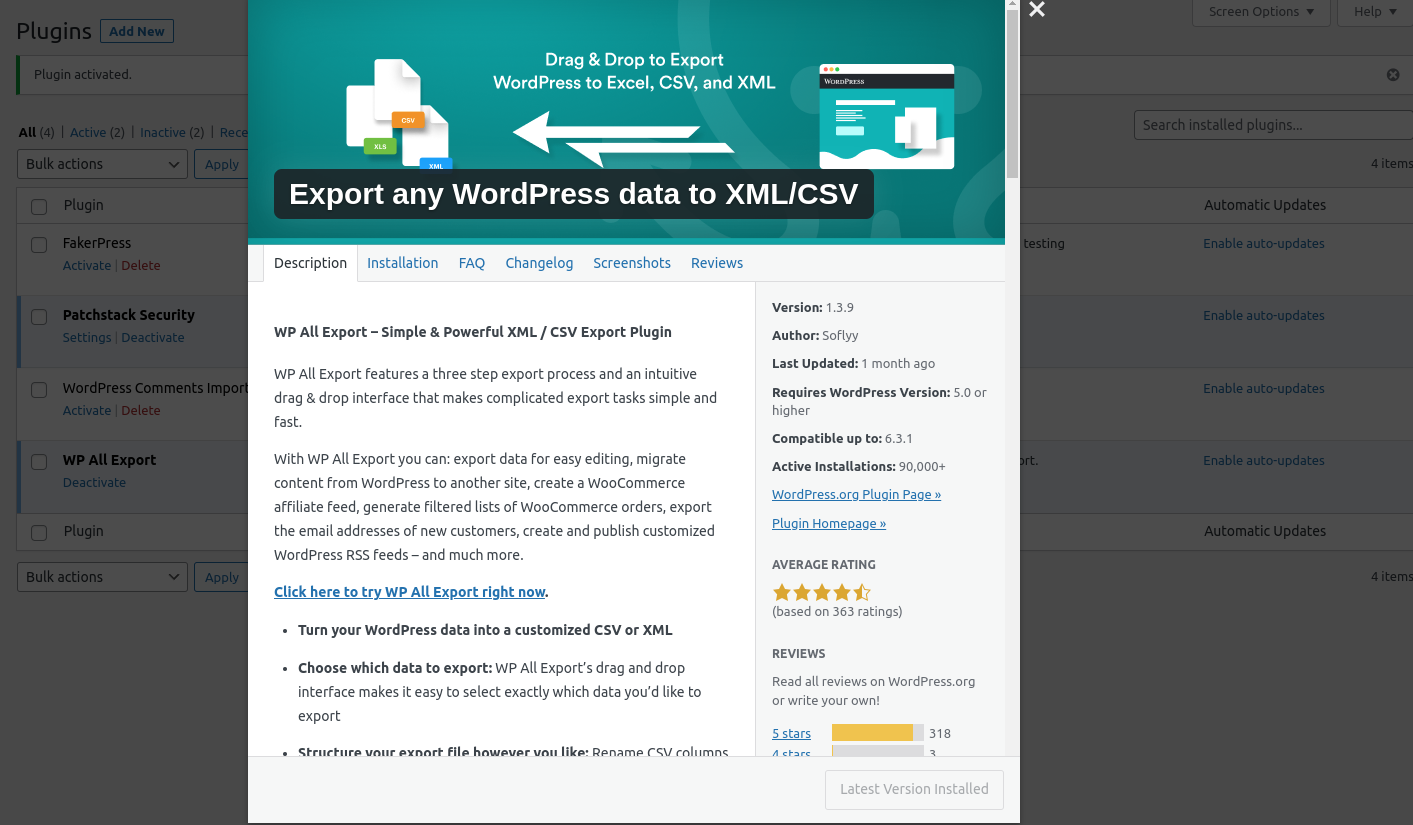
The process of exporting email addresses is straightforward. After installing and activating the plugin on your WordPress site, navigate to “All Export” and select “New Export“, then choose “Comments“.
The plugin will then display the total number of comments available for export. You can filter this number by creating filters in the “Add Filtering Options” section, but for now, leave the export unfiltered.

After setting up the export, click on “Customize Export File“. You’ll be taken to the “Drag & Drop” screen, where you can build your export file by selecting the export columns. To export author email addresses, look for the “Author Info” section in the “Available Data” section on the right. Drag and drop the “Author Email” field from this section to the column selection area.
After customizing the columns, click “Export”. This will create a new file that contains all the requested columns.
Manual export
You can manually export email addresses from your WordPress comment database using phpMyAdmin – a popular database management tool. Here are the step-by-step instructions for doing this:
- Log in to your web hosting control panel or server where your WordPress website is hosted. Typically, you can find a link to phpMyAdmin in your hosting control panel.
- In the phpMyAdmin dashboard, you’ll see a list of databases on the left-hand side. Click on the database that corresponds to your WordPress website. This should be the database where your WordPress installation is stored.
- Once you’ve selected your WordPress database, you’ll see a list of tables within that database. Find and click on the table named wp_comments (note that the table prefix wp_ may vary if you’ve customized it during the WordPress installation).
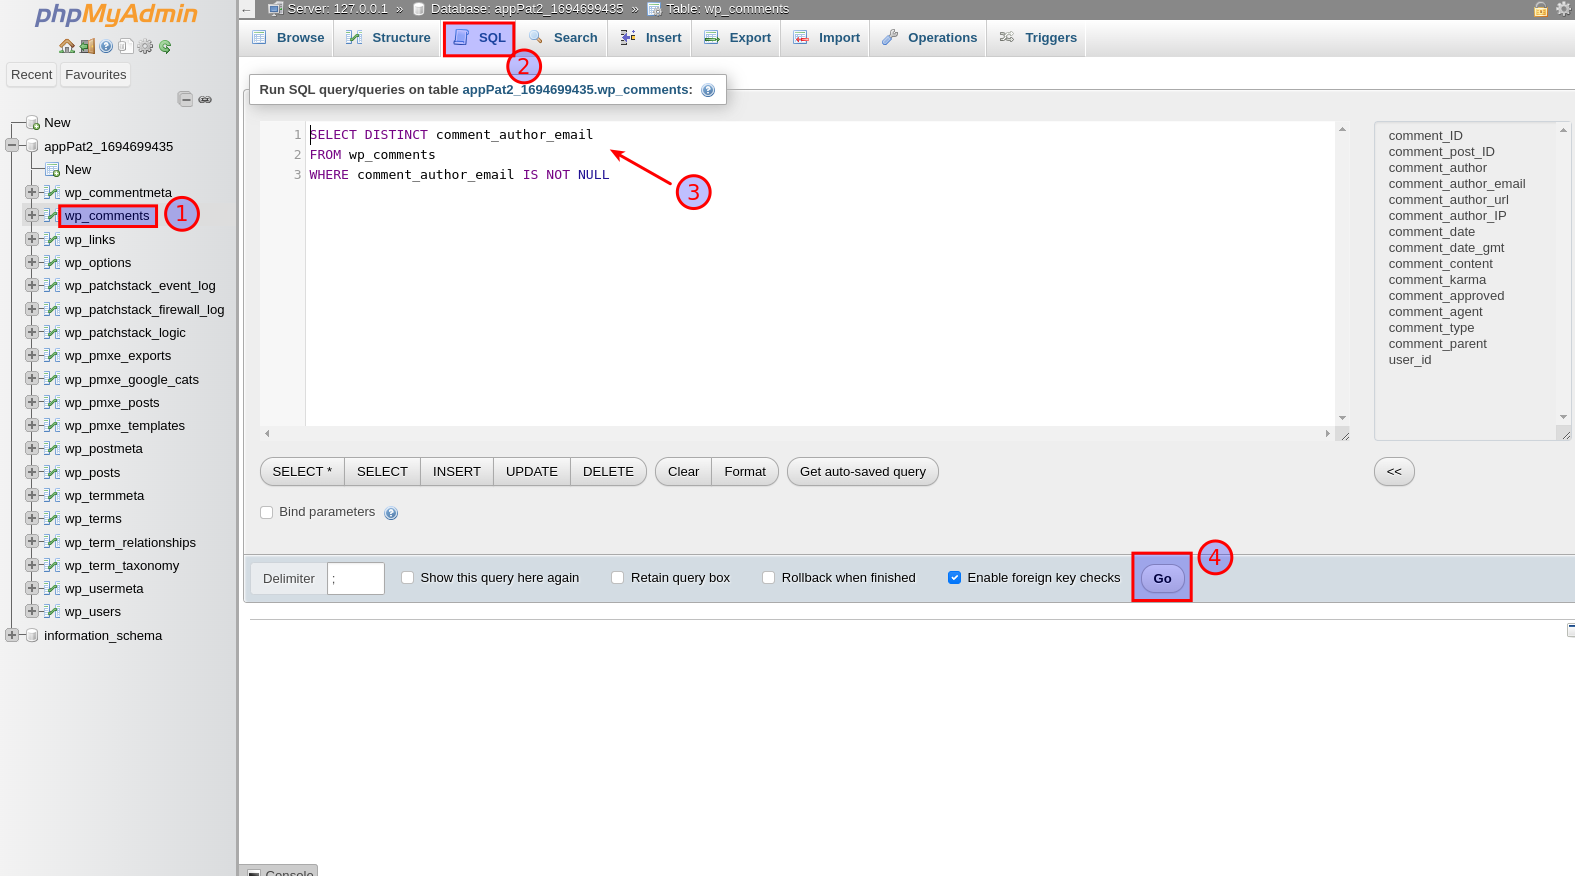
- After selecting the `wp_comments` table, click on the “SQL” tab located at the top of the phpMyAdmin interface. This is where you can execute SQL queries.
- In the SQL query editor, paste the following SQL query:
SELECT DISTINCT comment_author_emailFROM wp_commentsWHERE comment_author_email IS NOT NULLThis query will select all distinct email addresses from the wp_comments table where the email address is not NULL (empty). After pasting the query, click on the “Go” button to run it.
- Once the query is executed, phpMyAdmin will display the results in a table format. To export the email addresses, you have a couple of options:
- Print: You can click on the “Print View” button to format the results for printing. After formatting, you can use your browser’s print functionality to print the results.
- Copy to Clipboard: Alternatively, you can click on the “Copy” button to copy the results to your clipboard. You can then paste the email addresses into a text document or spreadsheet application of your choice.
- Export: You can also export the results to a file, click on “Export” on the bottom of the screen, this will take you to a new page. On this screen, you can change the format of the file (CSV, PDF, Latex, etc.) from the drop down menu and then click Export to download the file.
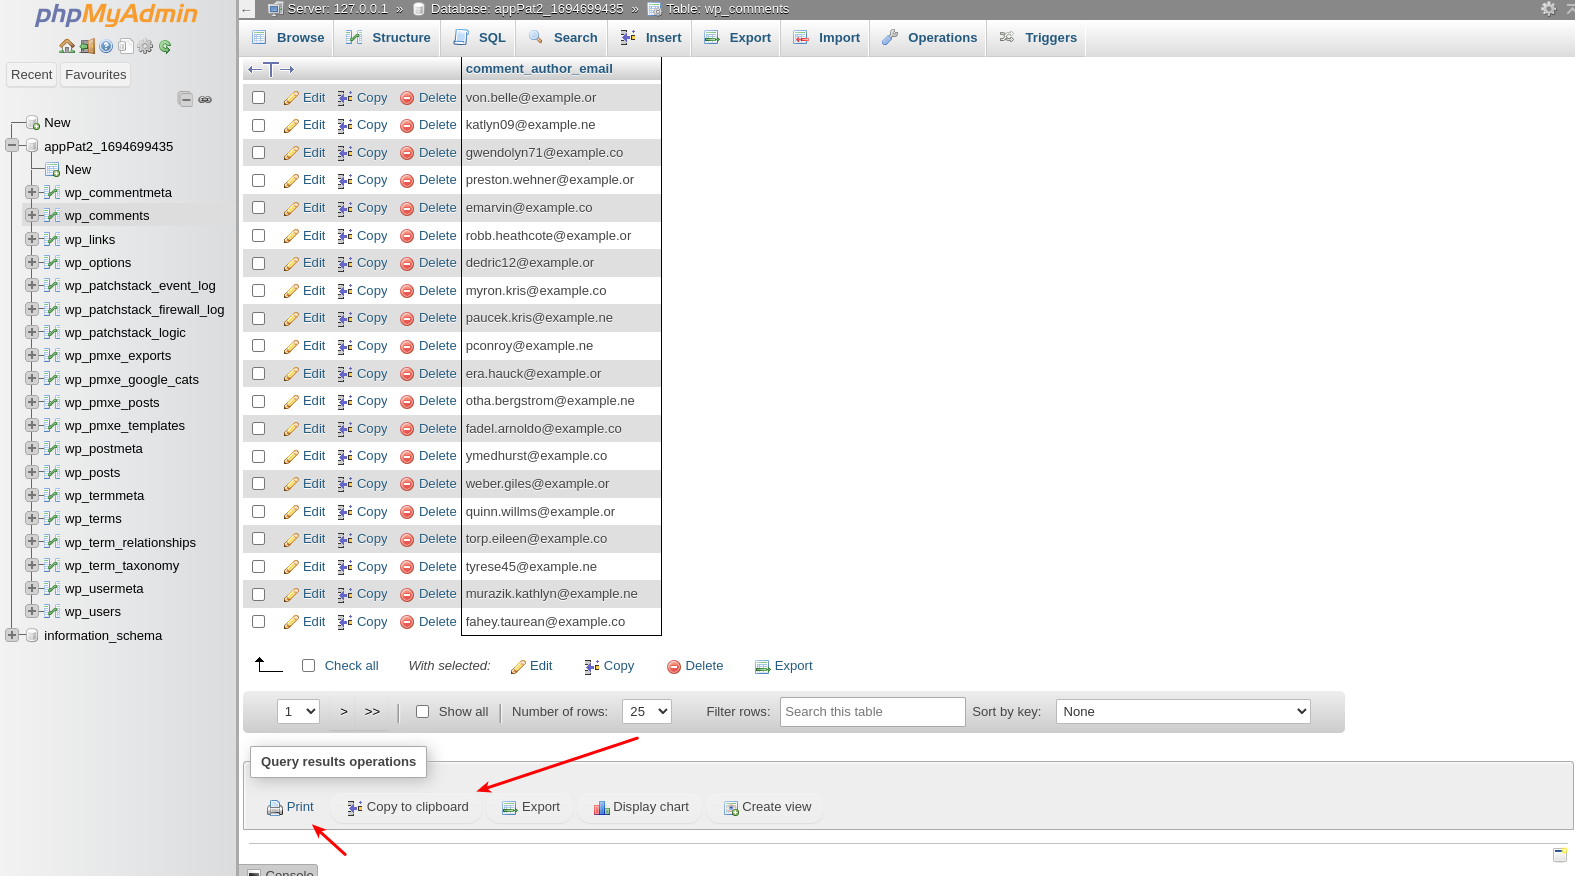
That’s it! You’ve manually extracted email addresses from your WordPress comment database using phpMyAdmin.
Segmentation and Personalization Strategies
Once you’ve successfully collected email addresses from your WordPress comments, the next step is to segmentation and personalization to make this collected data much more useful to your marketing efforts. Doing this not only improves the relevance of your communications, but also significantly improves the likely engagement and conversion rates. Statistics have shown that segmenting your audience this way can lead to a 760% increase in revenue!
Here’s how you can do this:
What is Segmentation?
Segmentation involves categorizing the emails you have collected based on specific criteria, such as behavior, demographics, engagement level, or the type of content they interacted with on your website.
With a WordPress website the most obvious way of doing this is by considering the articles or posts the users showed an interest in. This helps to give you a better idea of their preferences, allowing you to tailor your communications much more effectively.
How To Segment Your Audience
- By Content Engagement: Group users based on the topics of the blog posts they commented on. This shows you what sort of content or topics they’re most interested in, allowing you to send them more related content.
- By Activity Level: Segment users into active, occasional, and inactive commenters. Active users might appreciate more frequent updates, while you could develop different strategies to try to re-engage those who are less active.
- By Sentiment: If your comment section supports reactions (like, dislike, love), you use these as a basis to understand user sentiment, and segment using this as a guide to how you might best interact with them.
Personalization
Personalization goes hand in hand with segmentation. It’s about creating messages that resonate with each segment of your audience, helping to make each communication feel much more personal, relevant, and individual. Personalized emails have been shown to dramatically increase open rates and engagement, with an 82% greater open rate.
How to Personalize Your Emails:
- Tailored Content Recommendations: Based on the segment’s interests, recommend specific articles, products, or services that align with their preferences. For instance, if a segment frequently comments on tech-related posts, send them emails highlighting your latest tech content or gadgets.
- Personalized Email Greetings: Use the commenter’s name in the email greeting to add a personal touch. Most email marketing tools allow you to automatically insert the recipient’s name from your contact list.
- Segment-Specific Offers: Provide offers or promotions tailored to the segment’s interests. For example, offer a discount on a cooking class to users who are engaged in your food-related content.
- Engagement-Based Email Sequences: Design email sequences that respond to the level of engagement. New subscribers might receive a welcome series, while long-time followers receive advanced content or exclusive offers.
Implementing the Strategies
To put these strategies into place you’ll need an email marketing tool that supports segmentation and personalization. Tools such as Mailchimp, Constant Contact, and Sendinblue offer these features, along with integration options for WordPress. They allow you to import your exported email list, segment it based on your chosen criteria, and design personalized emails that speak directly to each group’s interests and behaviors.
Remember, the goal of segmentation and personalization is to deliver value to your subscribers. By understanding their needs and preferences, you can create more engaging and relevant email content. This not only improves the reader’s experience but also fosters a deeper connection between your brand and your audience, driving loyalty and conversion over time.
Data Protection: Ensuring Security and Encryption
Once you’ve collected email addresses, it’s your responsibility to protect them. Data breaches can have severe consequences for both users and your website’s reputation. Here’s why data protection is critical:
- User Trust: Ensuring the security of collected email addresses is vital for maintaining user trust. Users need to feel confident that their data is safe in your hands.
- Legal Obligations: Data protection laws often require organizations to implement adequate security measures to safeguard personal information. Failing to do so can result in legal repercussions.
Conclusion
Collecting and exporting email addresses from WordPress comments can be a powerful way to engage with your audience and grow your online presence. However, it must be done responsibly and ethically, respecting user privacy and complying with relevant laws. By following the steps outlined in this article, you can leverage this valuable resource while maintaining trust with your readers.
The methods outlined here are just a few of many ways to accomplish this task, and your choice may depend on your specific needs, technical expertise, and the tools at your disposal.
If you have a preferred method for exporting email addresses from WordPress comments that we haven’t covered in this article, we’d love to hear from you. Please share your insights in the comments below.